Simulation Modeling with Simio - 6th Edition
Chapter
15
Adding Detail to Service: A Bank Example
We have previously modeled a movable resource as a worker. Entities would request the resource to visit a specific node in the Seize step, forcing the worker to move to the node before allowing the entity to enter service. Vehicles can also be seized and used as resources in the exact same way. The Worker object is a specialized Vehicle that can transport entities as well as be seized and released as a resource.223 The modeling concepts relative to moveable resources used in this chapter will apply to vehicles or workers.
A small bank has several loan officers who assist customers with various loans and other account information, as seen in Figure 15.1. Customers arrive and wait for an available loan officer. The loan officer goes to the waiting room and escorts (i.e., picks up) the customer back to the office to help the customer. After this process is complete, some customers require a visit to their safety deposit boxes, which requires the loan officer to escort them to the vault area and assist the customer again. The loan officer can be modeled using a worker or a vehicle.

Figure 15.1: Bank Example where Worker Picks up Customers as well as Services Them
15.1 Using a Worker as a Resource and a Vehicle
One advantage of using a worker as a moveable resource is the worker can also be used as a vehicle. For example, the Vet or a technician may go to the waiting room and escort (i.e., pick up) the patient to the room where the Vet sees the patient (i.e., the Vet is seized). That kind of transportation is being done in the bank.
15.1.2 Insert a Source named SrcWaitingRoom, a Server named SrvRoom, and a Sink named SnkExit.
- Connect the output of the SrcWaitingRoom to the input of the SrvRoom via a 15-meter path and then the output of the room to the Sink (SnkExit) by another 15-meter path.224
- Customers arrive exponentially with an interarrival time of 6.5 minutes.
- The capacity of the Server should be one.
- Each customer takes between 10 and 20 minutes to be seen, with most of them taking 18 minutes.
15.1.3 Insert a new ModelEntity named EntCustomer and a Worker225 named WkrBanker into the model. The customers and bankers travel at a constant rate of 1.5 km per hour or 1500 meters per hour.
- For the EntCustomer entity, add four additional symbols and change each of the five symbols to be represented by one of the People\Animated symbols in the Library226. If you utilize just the “static” “people” symbols, the people will “skate” across the paths. The animated symbols will allow the people to physically walk, run, and/or skip. For the EntCustomer, set the Animation→Random Symbol to “True” so it will randomly select one of the five people.
- Change the symbol of the WkrBanker to one that is more representative using one of the animated people as well. To simplify the presentation, we delete all ten of the alternative symbol states.
- For the Worker, move the animated ride queue (Ride Station Queue)227 so it is beside the WkrBanker instead of on top for a normal Vehicle, as seen in Figure 15.2. Notice that the ride station queue is automatically given the option of “Match Attached Animation Speed,” meaning the “rider” will walk at the same speed as the worker.
- Also, for the worker, set the Initial Node (Home) to Output@SrcWaitingRoom and set the IdleAction to Park at Home.
- Now, for the WkrBanker, set the Park While Busy property under the Resource Logic section to “True” to force the banker to park when it is utilized as a resource.
- Make sure the Source creates the EntCustomer ModelEntities.
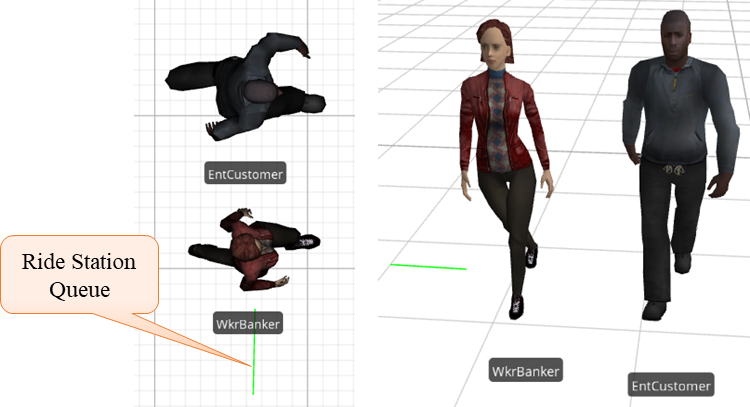
Figure 15.2: Two and Three-Dimensional Versions of a Banker and Customer
15.1.5 In the next step, the WkrBanker should pick up the customers from the waiting room and deliver them to the room. Change the outgoing transfer node (Output@SrcWaitingRoom) at the SrcWaitingRoom to require a transporter, as seen in Figure 15.3. Change the Ride On Transporter property to “True,” choose a specific Transporter Type, and specify the WkrBanker as the vehicle requested.
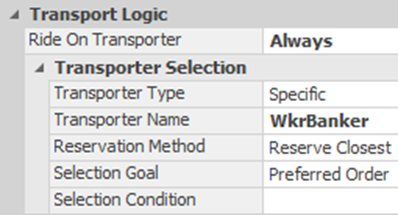
Figure 15.3: Changing the Node Logic to Request a Transporter
15.1.6 Make the path between the SrcWaitingRoom and the SrvRoom bidirectional so the banker can move between the two locations. Generally, two unidirectional paths are better to prevent blockage.
15.1.7 Save and run the model, making sure the WkrBanker moves the entities to the room.
15.1.7.1 What did you observe (i.e., does the WkrBanker stay with the EntCustomer while they are being processed)?
_______________________________________________
The WkrBanker is currently operating as a Vehicle only that transports the customers from the waiting room to the office. It does not necessarily stay with the customer while it is being processed but continues back to pick up the next customer and move them to the room.
15.1.8 Insert a new TransferNode named TRoom228 above the SrvRoom and connect it via a one-meter bidirectional path to the input of the SrvRoom, as seen in Figure 15.4. The TRoom node will serve as the location where the worker will serve the customer. This node could also serve as the home node for the worker if the worker is idle. So, for WkrBanker, modify the Initial Node (Home) to TRoom.
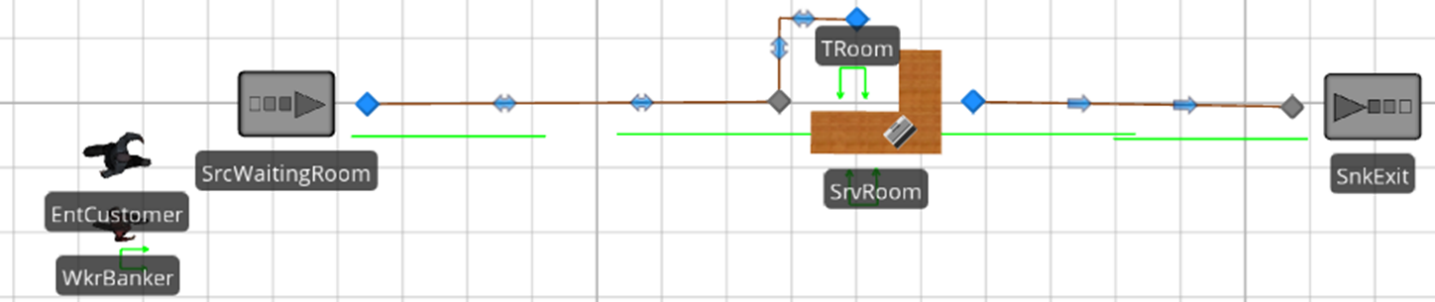
Figure 15.4: Model that Uses Vehicles as both a Resource and a Transporter
15.1.9 In the Before Processing add-on process trigger of the SrvRoom Server, use a Seize step that will seize the WkrBanker and request a visit to the TRoom node (see Figure 15.5 for more information).229
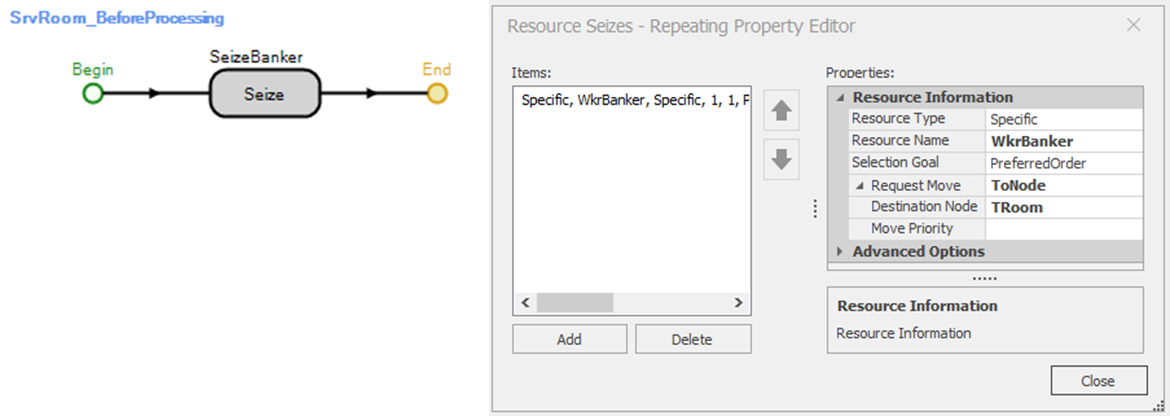
Figure 15.5: Requesting a Banker for a Customer to be seen at the TRoom Node
15.1.10 In the “After Processing” add-on process trigger of the SrvRoom Server, use a Release step that releases the WkrBanker once it has seen the customer.230
15.1.12 When the customer seizes the banker at the office, it is automatically shown in the parking queue of the TRoom TransferNode, and the customer is shown automatically in the processing station contents queue above the server SrvRoom. We will improve the animation to have the customer and banker face each other across a desk, as seen in Figure 15.6.
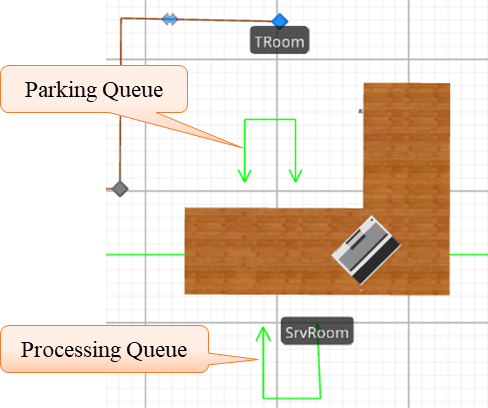
Figure 15.6: Requesting a Banker for a Customer to be seen at the TRoom Node
- Select the SrvRoom server and change the symbol to a desk by selecting the “Desk1” symbol in the Library/Furniture section.
- Move the processing contents queue below the desk and change its alignment to Oriented Point. Make sure the oriented points are facing the desk, as seen in the figure.
- Next, select the TRoom transfer node and turn off the automatic parking queue by toggling the Parking Queue button in the Appearance→Attached Animation section. From the Draw Queue dropdown, insert a Parking Station.Contents with Oriented Point alignment.231
15.2 Having the Banker Escort the Customer to the Saftey Deposit Box Room
In this bank, 45 percent of customers need to visit their safety deposit box after seeing the banker.232 A similar modeling method as used previously to route patients to an X-ray machine with the assistance of the Vet will be used. The WkrBanker resource will not be released if the customer needs to visit the safety box.
15.2.1 Insert an additional Server named SrvSafetyDeposit.
- Set the capacity of the Server to one since there is only one vault area.
- The processing time for a customer to retrieve their safety deposit box and perform any actions follows a Pert distribution with a min, most likely, and maximum values of 10, 15, and 25 minutes, respectively.
- Connect the output of the SrvRoom to the input of the SrvSafetyDeposit via a five-meter Path.
- Connect the output of the SrvSafetyDeposit to the SnkExit via a 15-meter logical Path.
15.2.2 Modify the SrvRoom_AfterProcessing add-on process trigger to model the banker behavior when the customer needs to be escorted to the safety deposit box 45% of the time. From the Definitions tab, add a new Real Property named GProbSafetyDeposit and set the default to 0.45. Insert a Decide step (as seen in Figure 15.7) that is probabilistic based with GProbSafetyDeposit as the expression.

Figure 15.7: Using Set Node to Send Customers to the Exit or Vault Machine
15.2.3 If a visit to the safety deposit box is needed (i.e., the true branch), insert a Set Node step that will set the destination node of the entity to the input at SrvSafetyDeposit.233 If not visiting the safety deposit box (i.e., the false branch), release the WkrBanker and then set the destination node to the input at the SnkExit.234 See Figure 15.8 for the property details of the two Set Node process steps. When the entity enters the TransferNode of the SrvRoom where the Entity Destination Type has been set to continue, the destination node that was set using the Set Node step will be used to route the entities.

Figure 15.8: Property Settings for the Set Node Property to Send the Entity to the Vault or the Exit
15.2.4 Insert the “After_Processing” add-on process trigger for the SrvSafetyDeposit that will release the WkrBanker once the service is completed, as seen in Figure 15.9.235

Figure 15.9: Property Settings for the Set Node Property to Send the Entity to the Vault or the Exit
15.2.5 Save and run the model.
15.2.5.1 What is the advantage of defining a property instead of specifying 0.45 directly in the Decide?
_______________________________________________
15.2.5.2 Do some of the customers flow to the safety deposit vault server?
_______________________________________________
15.2.6 The WkrBanker does not move with (i.e., escort) the customer from the room to the safety deposit machine. To facilitate the moving of the WkrBanker to the SrvSafetyDeposit, paths have to be added to allow the WkrBanker to move to the vault room, as seen in Figure 15.10.
- Insert a new TransferNode named TSafetyDeposit near the SrvSafetyDeposit which will be the node the WkrBanker will transfer to for processing the customer at the safety deposit machine.
- Insert a one-meter path from the TRoom transfer node to the output node of the SrvRoom so the WkrBanker can use the same path to escort the customer to the safety deposit box.
- Connect the input of the SrvSafetyDeposit to the TSafetyDeposit transfer node via a one-meter Path and then connect the TSafetyDeposit node back to the output of the SrcWaitingRoom via a 15-meter Path, which allows the WkrBanker to travel back to the waiting room to get the next customer.
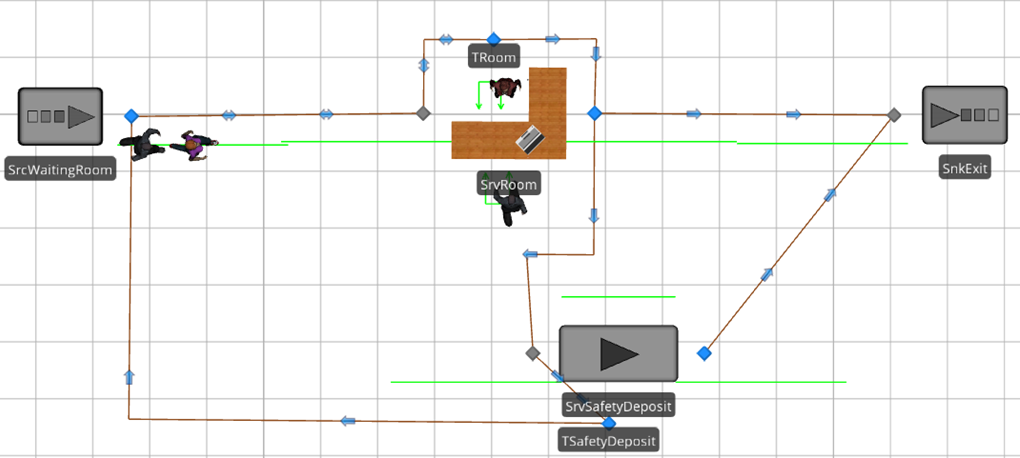
Figure 15.10: Model for Transferring Customers and the Banker
If the customer needs to see his safety deposit box, the WkrBanker needs to travel to accompany them to the room. The process logic in the After_Processing add-on trigger in Figure 15.7 moves the entities to either the safety box or the exit based on a probabilistic Decide branch using a Set Node process step. When this process trigger runs, the Token that is executing the process steps is associated with the entity. Therefore, any steps (i.e., Transferring, Setting Nodes, etc.) are only applied to the entity236 associated with the Token.
15.2.7 Insert a Move step, which will request a move of one or more moveable resources that have been seized by the ModelEntity (i.e., the associated object), as seen in Figure 15.11.

Figure 15.11: Using the Move Step to cause the Banker to Move to the Safety Deposit Box
15.2.9 It may appear to move with the customer based on the speed of the animation. However, the banker will actually move to the TSafetyBox node first before the customer does. Place a breakpoint on the path connecting the TRoom and Output@SrvRoom nodes to see this phenomenon. Fast forward the simulation till it stops, and then slow down the animation speed under the “Run” tab.
15.2.10 When the customer (i.e., ModelEntity) requests a dynamic resource to be moved using the Move step, the token associated with the entity will wait until the movement occurs before proceeding forward (i.e., move itself). Therefore, we would like the banker and customer to move independently. To manipulate the banker, it will be necessary to identify the banker and then influence it. To accomplish that in this model we will employ a Search process step. The Search process step can search a collection of items and return Tokens associated with the items as specified in Table 15.1 and Table 15.2.
| Property | Description |
|---|---|
| Collection Type | Type of the collection to search (See Table 15.2 for more information). |
| Search Type | The type of search to perform (Forward, Backward, MinimizeReturnValue, and MaximizeReturnValue).237 |
| Match Condition | Optional match condition that can be used to filter the items in the collection before the search begins. Don’t forget to use the keyword Candidate in the condition. |
| Search Expression | An expression that is evaluated for each item found by the search. The total sum for this expression is returned in the ReturnValue of the original Token. One could save the particular Resource and Seize the exact same one later. |
| Starting Index | One based index to start searching. By default it is one for Forward searches while the number in the collection for Backward searches. |
| Ending Index | One based index to end searching to assist in narrowing the search within collection. |
| Limit | An expression that specifies the maximum number of items that can be found and returned. |
| Save Index Found | Specify an optional discrete state variable to save the last item found. |
| Collection Type | Description |
|---|---|
| ObjectInstance | Search all objects of a particular class (e.g., search all the entities that are currently created) |
| EntityPopulation | Search a particular entity population (i.e., ModelEntity, Worker, or Transporters) |
| ObjectList | Search the objects in a list (e.g., ResourceList, etc.) |
| NodeList | Search all nodes in a particular list. |
| TransporterList | Search all transporters in a particular list. |
| SeizedResources | Search the objects currently seized by the Parent Object, Associated Object or a Specific Object |
| QueueState | Search the objects currently in one of the queues |
| TableRows | Search the rows in a Data table |
| NetworkLinks | Search all links of a particular network. |
| NodeInboundLinks | Search all the inbound links of a particular node. |
| NodeOutboundLinks | Search all the out bound links of a particular node. |
15.2.11 If the customer needs to be escorted to the safety deposit box, insert a Search Step after the Set Node, as seen in Figure 15.12. The “Original” branch is associated with the original Token (i.e., customer), while the “Found” branch will be invoked for a Token associated with each item found.
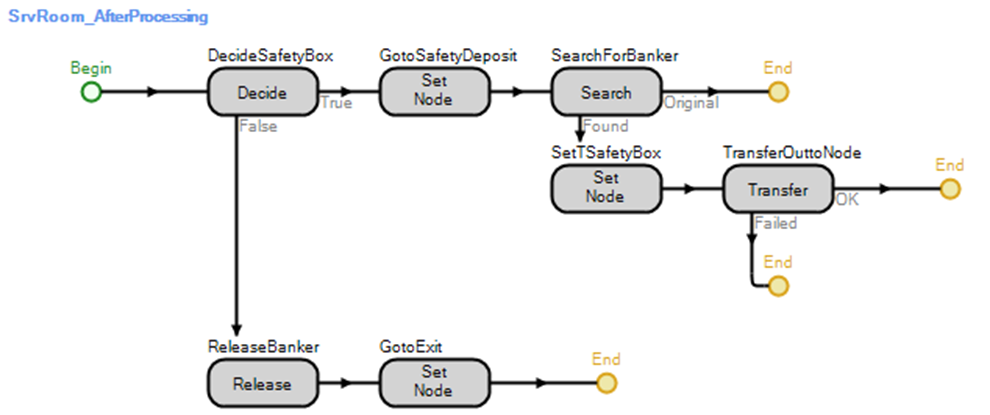
Figure 15.12: Searching for and Transferring the Banker
- Set the Collection Type property to SeizedResources and make sure the Owner Type is “AssociatedObject” which will search all the objects that have been seized by the customer.
- Set the Match Condition to Candidate.Object.Is.WkrBanker to only search for the banker that has been seized.238 This condition will ensure that only the seized banker is.
- Set the Search Expression property to return the “ID” of the Worker seized, which can be used for a further enhancement.
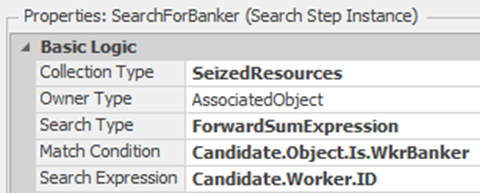
Figure 15.13: Properties of the Search Process Step
15.2.12 Once the WkrBanker has been found, we need to set the node to the TSafetyBox and then using a Transfer239 process step transfer out of the parking station (i.e., the current stations) and into the TRoom node as seen in Figure 15.12 with the properties as in Figure 15.14.240

Figure 15.14: Transfer Process Step Properties to Move Banker to the Vault
15.3 Using the Transport Function of the Worker
The difficulty of the previous model, the customer and the banker worker moved independently of one another. Instead, the banker should pick up the customer (i.e., act as a vehicle) and then transport the customer to the safety deposit vault, where the customer would then Seize it again, similar to moving the customer to the banker’s office. Here, the banker will serve the customer and provide transportation.
15.3.2 For the SrvSafetyDeposit Server, insert a Before_Processing add-on process trigger with a Seize step (or you can use the Secondary Resources) to seize the WkrBanker once the customer is dropped off. Use the Seize step in the Before_Processing that will seize the WkrBanker and request a move to the TSafetyDeposit node, as seen in Figure 15.15.

Figure 15.15: Seize the Banker at the Safety Deposit Vault
15.3.3 However, only certain entities need to ride on a worker/vehicle (i.e., the ones heading to the safety deposit box) while the other customers will walk to the exit. Therefore, the output node at the SrvRoom cannot be specified to “Ride on Transporter” like the output node for the Source since this would force all customers to ride. A Ride process step can be used to force an “Entity to Ride” on a vehicle. However, the Ride process step can only be utilized in a process trigger inside a TransferNode (e.g., [Output@SrvRoom]). Therefore, all of the logic used to determine where the entity will proceed after processing must be removed.
- Remove the After Processing add-on process trigger from the SrvRoom by choosing “null” from the dropdown241 or using “reset” on the right-click since this logic will be needed in a different object’s add-on triggers, as seen in Figure 15.16.

Figure 15.16: Removing an Add-on Process Trigger from an Object
- Select the output TransferNode for the SrvRoom and then choose the SrvRoom_AfterProcessing242 process as the “Entered” add-on process trigger, as seen in Figure 15.17. The Entered add-on process will be fired when an entity, worker, or vehicle enters the TransferNode.
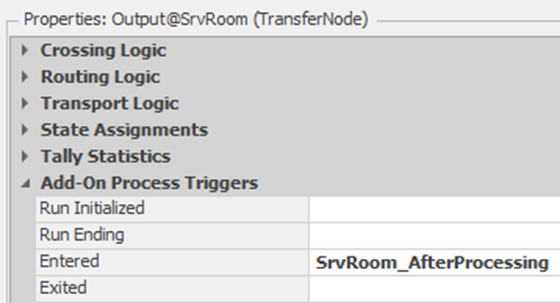
Figure 15.17: Specifying the Entered Add-On Process Trigger
15.3.4 If the customer needs to visit the vault, the customer should request a ride and then release the WkrBanker so it can respond to ride requests.
- In the SrvRoom_AfterProcessing process, delete the Search step since it will not be needed.
- Insert a Ride step with the Transporter Type set to “Specific” and the specific Transporter Name specified as a WkrBanker (see Figure 15.18).
- If the entity needs to see their safety deposit box and the customer
has requested a ride, the WkrBanker needs to be released so it
can pick up the customer in order to transport it to the safety
deposit box. To reuse the same Release in the “False” branch, drag
the end of the branch (
 ) associated with the Ride step and
drop it on top of the Release step.243
) associated with the Ride step and
drop it on top of the Release step.243
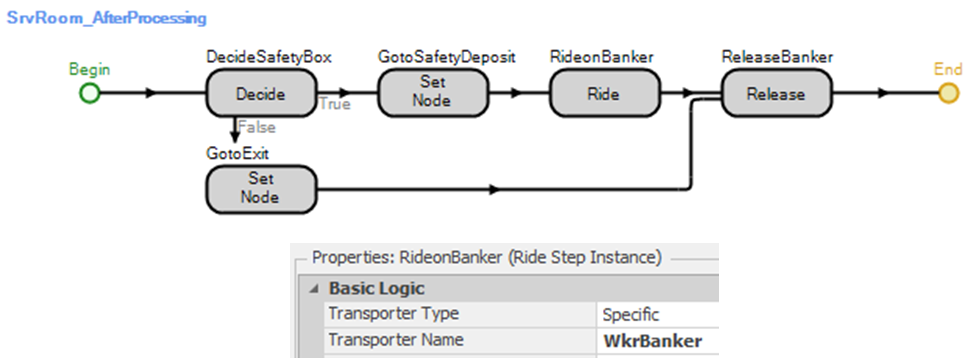
Figure 15.18: Adding the Ride Step and then Releasing the Banker
15.3.6 The banker is stalled at the desk while the customer waits for a ride to the safety deposit box. More specifically, the Token associated with the entity in the process is waiting at the Ride step owing to the Token Wait Action property (within the Advanced Options), which specifies, by default, to “WaitUntilTranferred” (i.e., until the entity has finished being transferred into the vehicle). Now change the Token Wait Action property to “NoWait,” as shown in Figure 15.19.
Figure 15.19: Changing the Token Wait Action
15.3.7 Save and run the model.
15.3.8 When the WkrBanker, which is a vehicle, reaches the output node of SrvRoom to pick up the customer, it actually enters the node, thus running the same logic in Figure 15.18, which tells it to exit or get picked up by a banker. This then creates the system deadlock. Only customers should run the logic.
15.3.9 Insert another Decide step (see Figure 15.20) before the current Decide step, which checks to see if the object associated with the Token is a ModelEntity. The Is operator will check to see if the object is a particular object, which, in this case, Is.ModelEntity will return “True” if it is a customer and “False” if it is a Banker (i.e., Worker/Vehicle), as seen in Figure 15.20.

Figure 15.20: Using the ‘Is’ Operator to determine if an Object is an Entity
15.3.11 The problem is the WkrBanker responds to ride requests in the order they arrive. Customers going to the safety deposit machine should be given priority.
Add an Assign step that changes the customer’s priority (ModelEntity.Priority) to two (see Figure 15.21).
Select WkrBanker and then change the Task Selection Strategy property under the Transport Logic properties to be the “Largest Priority,” as seen in Figure 15.22.244
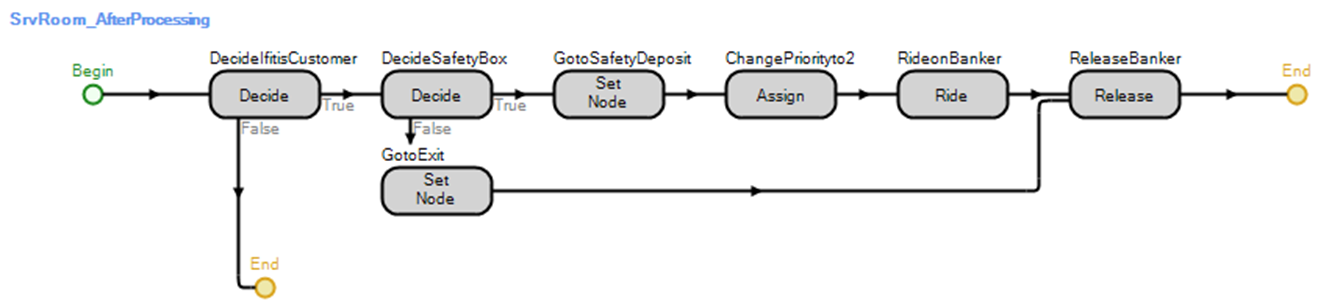
Figure 15.21: Adding the Ride Step and then Releasing the Banker
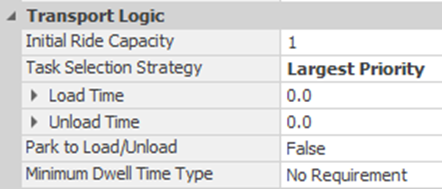
Figure 15.22: Changing the Task Selection Strategy of a Vehicle
15.4 Resource Reservations
The previous section illustrated a worker’s use for service and transportation. However, continued use of this resource during a sequence of needs required a careful set of seizes, rides, and releases. You should note that if someone had requested a seizure of the banker, it would have handled that request before responding to the ride request, regardless of the priority. In these cases, it is easier to use a resource reservation. An entity may “reserve” a resource, worker, or vehicle for continued use at different stages. By reserving it, the entity may use it immediately or later. While being reserved, the resource cannot be used by another entity. A resource may be reserved at a TransferNode or in the “Resource for Processing” in the “Secondary Resources” section of an object or in a process using a Reserve step or the Release step. Reservations may be implicitly canceled using the Release step or explicitly using the Unreserve step. Reservations made through the Secondary Resources will be automatically canceled when service is complete. So, each customer arriving at the bank will reserve the banker for use throughout the process until the banker is no longer needed.
15.4.1 At the [Output@SrcWaitingRoom], modify the “Transport Logic” to cause the transporter to be reserved as shown in Figure 15.23. Adding this specification causes the banker to be reserved for this customer and unavailable to any other customer for any type of service until the reservation is canceled.245
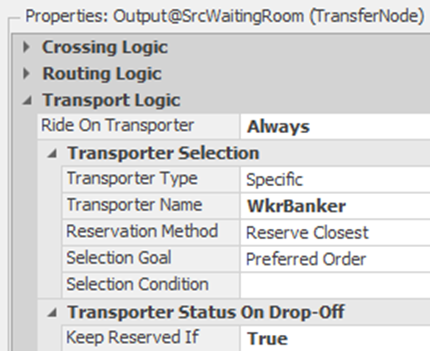
Figure 15.23: Creating a Reservation at Transport
15.4.2 The customer requests service from the reserved banker at the office. After the banker serves at SrvRoom, the customer will either release the banker and exit or keep the banker to be escorted to the safety deposit. Change the SrvRoom_AfterProcessing to have a separate Release, as shown in Figure 15.24. The Assign step is no longer needed as we will continue reserving the WkrBanker.

Figure 15.24: Modifying the Process
15.4.3 When the customer exits, the banker is released. Unless the Release step specifies keeping the reservation, the reservation is automatically canceled. However, those customers who go to the safety deposit box keep the reservation in the Release step in the process going to the safety deposit box, as shown in Figure 15.25. Note the Reservation Timeout expression property allows you to specify logic that will cancel the reservation if the entity still has reserved the object when the time expires.
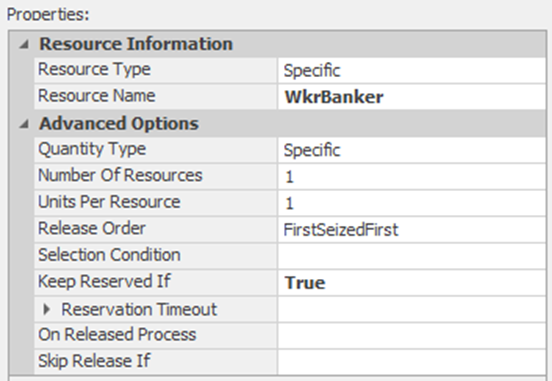
Figure 15.25: Keeping Reservation on Release
15.5 Animated Entities
The “animated people” that have been added to SIMIO can enhance the visual appeal of a simulation. Each animated people symbol (e.g., female, male, children, elderly, soldier, and cartoon people) has a an animated ModelEntity/Worker/Vehicle and selecting “List Animations of Active Symbol.” Table 15.3 shows the lists of male and female animated people. You can invoke an animation by its “Index” or its name “Name.” Now, the animation lists are identical across people’s symbol groups, as can be seen in list.
| Index | Name | Index-Cont | Name-Cont |
|---|---|---|---|
| 1 | Stand | 12 | Walk Carrying Left |
| 2 | Stand Shifting Weight | 13 | Walk Pushing |
| 3 | Stand Talking on Phone | 14 | Run |
| 4 | Stand Texting | 15 | Sit |
| 5 | Stand Picking Up | 16 | Sit Legs Crossed |
| 6 | Stand Moving Hands | 17 | Sit Talking |
| 7 | Stand Carrying Front | 18 | Sit Moving Hands |
| 8 | Stand Carrying Side | 19 | Sit Driving |
| 9 | Walk | 20 | Sit to Lie Down |
| 10 | Walk Carrying Front | 21 | Sleep |
| 11 | Walk Carrying Right | 22 | Dance |
15.5.1 To illustrate the use of animated entities, let’s reconsider the model from the first section of this chapter. Add two chairs at the desk, one for the banker and one for the customer, using the Drawing → Place Symbol, as shown in Figure 15.26. You may need to adjust the placement of the chairs, the parking station queue, and the processing station queue as you see the animation perform.

Figure 15.26: Add Chairs around Desk
15.5.2 One of the ModelEntity state variables that SIMIO defines in the Definitions→ States is “Animation.” This “string” state variable can be used to hold the current entity animation and it can be used to assign a new animated behavior. Specify the “Animation” properties section of the EntCustomer as shown in Figure 15.27.
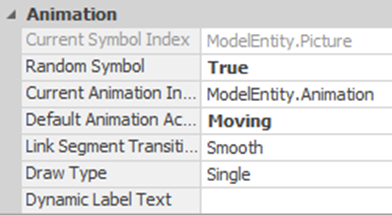
Figure 15.27: Animation Properties of the Customer
15.5.3 Workers and Vehicles do not have individual state variables like ModelEntities. So, we need to define a new Model Discrete String State variable named GStringStateWorker for the banker, which can be changed. So now specify the “Animation” properties of the WkrBanker as shown in Figure 15.28.
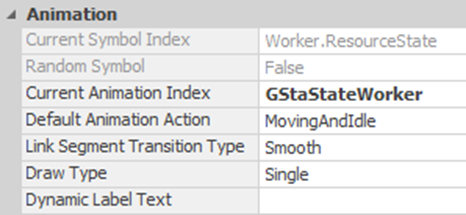
Figure 15.28: Animation Properties of the Banker
15.5.4 The customer should walk to the banker’s desk and then sit in the chair. So, in the Before Processing add-on process trigger of the SrvRoom Server, add the assignment shown in Figure 15.29.

Figure 15.29: Customer Sits at Banker’s Desk
15.5.5 Then the customer should walk to the exit or the safety deposit room. So, in the SrvRoom_AfterProcessing process, add the assignment shown in Figure 15.30.

Figure 15.30: Customer Walks to Exit
15.5.6 The banker needs to sit at the desk. So, in the “Entered” add-on process trigger of the TRoom TransferNode, add the assignment shown in Figure 15.31.

Figure 15.31: Banker Sits
15.5.7 The banker needs to walk again when they leave the desk to pick up the next customer or take the current customer to the safety deposit box. So, in the Exited add-on process trigger, add the Decide and Assign step, as shown in Figure 15.32. Recall that we specified that the WrkBanker would park when they were seized. When the Worker object enters the parking station, it exits the node and runs the Exited add-on process trigger, forcing the banker to walk after they were told to sit. The IsParked function returns true once the worker enters the parking station before exiting the node and, therefore will not set the variable to “Walk.”246

Figure 15.32: Banker Walks
15.5.8 Save and run the model by looking carefully at the animation247.
15.6 Detailed Service: Tasks and Task Sequences
A service activity may be composed of several tasks rather than a simple processing time. For example, the kitting of an electronic product may employ a sequence of tasks to complete the kit, or an inspection may require a number of tests at the inspection station. Often, the details of these types of operations can be conveniently summarized by their processing time. There are, however, instances when the processing time needs a composition of a set of interrelated tasks. SIMIO, therefore, recognizes two types of processing stations within a Server, which are referred to as Process Types. Specifically, the alternative specifications are “Specific Time” or “Task Sequence”. Currently, we have only modeled using the Specific Time, which is the default value. When more details about a process need to be included in the model, the model is extended with more objects (i.e., additional servers are inserted). Using a Task Sequence process type, details about processing can be incorporated into a set of task sequences within a single Server.
Currently, the bank has a loan officer who assists customers with various loans, account information, special deposits, and safety deposit box usage. A single processing time distribution was used to describe that service. In the example, the loan officer escorted customers back to the office for general service. A portion of the customers required a visit to their safety deposit box, which required the loan office to accompany them. In that example, we employed the Worker for service and transportation, breaking up the tasks into two separate servers and flows. We want to reconsider the bank service and employ a different modeling approach to incorporating details of the office service. More specifically, we want to recognize that the service being provided by the loan officer is composed of a set of “tasks.” Each of the tasks has its own task properties. Some tasks must be performed before others, while some tasks may be performed in parallel (at the same time).
15.6.1 First, change the “Process Type” property of the SrvRoom to Task Sequence as seen in Figure 15.33.

Figure 15.33: Changing Process Type
15.6.2 This change reveals a Processing Tasks property, which is specified through the Repeating Property Editor and allows you to list the tasks. Add a task as shown in Figure 15.34. It is important to note that: (1) the Processing Time for the task is the same as before, (2) we added the Name of the task, and (3) we specified that this task needs the WkrBanker and it should be moved to TRoom node.
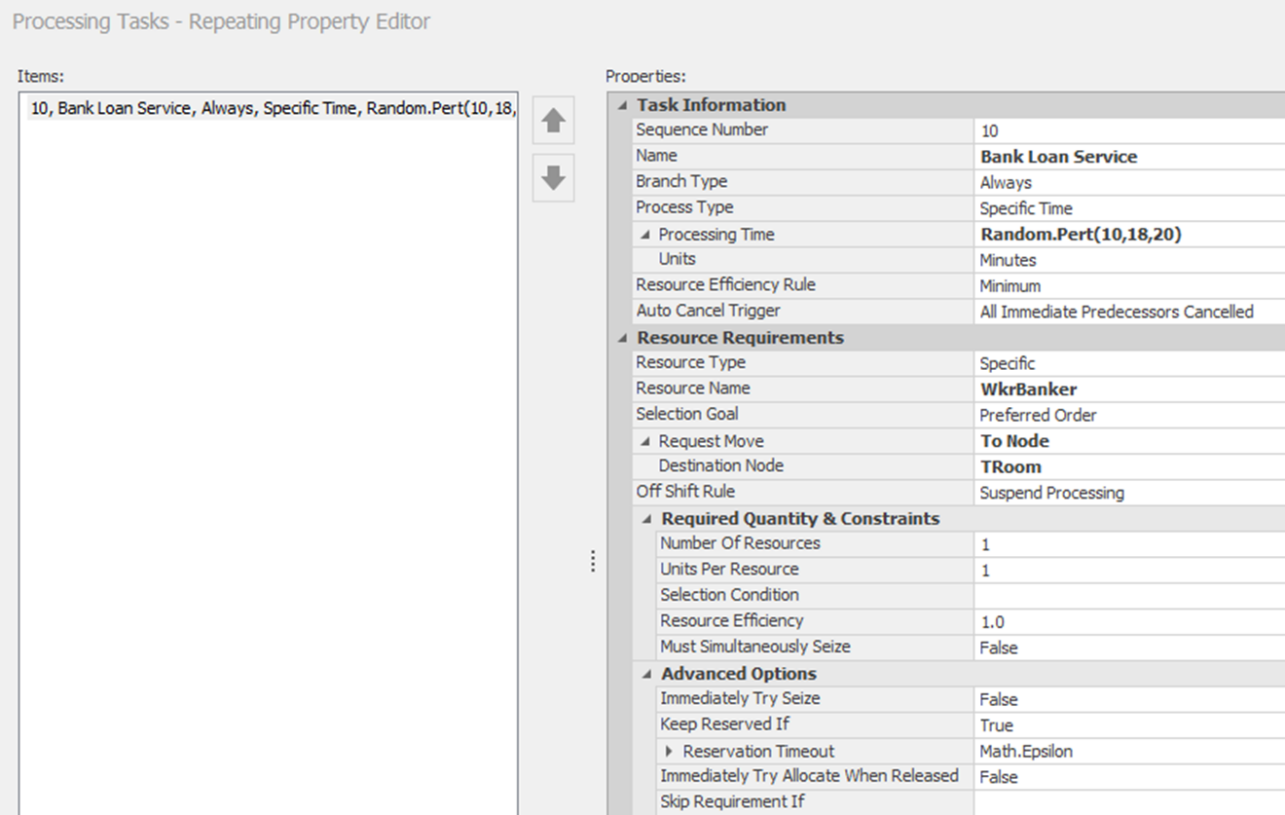
Figure 15.34: Adding a Task
15.6.3 By default, a Sequence Number of 10 is provided. We accepted the Branch Type of Always and specified the Process Type as Specific Time. We will modify these specifications in later sections.
15.6.4 Since we are specifying the use of the WkrBanker in the task, we can remove the Seize step in the SrvRoom_BeforeProcessing process and the Release steps in the SrvRoom_AfterProcessing process. Note that in Figure 15.34, the resource is Reserved by default specification of the task. This specification is for a Reservation Timeout of Math.Epsilon ensures this resource is held until the end of this time step event, so continued use of the resource is given priority.
15.7 Using Task Sequences
The previous example doesn’t illustrate the capability especially since we handled it with processes earlier or could have used secondary resources. A task sequence refers to a network of tasks ordered by precedence. For example, when modeling a patient visit to a doctor’s office, you need a nurse to take vitals and information, and then you need a doctor, which could potentially lead to more nurse visits. This would be harder to handle using a single Server. Let’s consider the banking service example, which has more complications. Suppose the Loan Officer service is really composed of three distinct tasks: (1) Task1: a review of the application, which takes Pert(3,5,8) minutes; (2) Task2: a request for records, which only happens in 20% of the cases, and (3) Task3: a final assessment of the loan, which takes Pert(5,7,10) minutes. The request for records doesn’t require time from the Loan Officer but is an automatic search that takes a Uniform(2,6) minutes. In other words, Tas k1 and Task 2 are done in parallel, but only Task 1 requires time from the loan officer, and Task 2 may only require time. Task 3 cannot start until both Task 1 and Task 2 are completed. A task sequence diagram is shown in Figure 15.35.
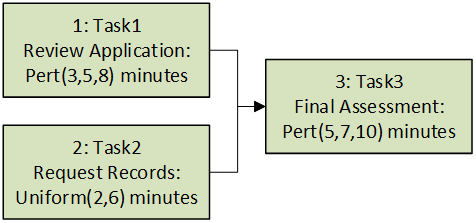
Figure 15.35: Adding a Task
Simio provides three alternatives for specifying task sequences within the Server. There are three options to specify the precedence diagram via the Task Precedence Method, as given in Table 15.4. In this example, we will use the Immediate Predecessors Method, which we find to be the easiest way to specify the precedence.
| Branch Type | Description |
|---|---|
| Sequence Number | Using a task sequence numbering scheme like XX.YY to determine which tasks precede others (e.g., 10 precedes 20.1 and 20.2 while 20.1 precedes 30.1). See the Commentary section 15.9 for more information. |
| Immediate Predecessors Method | Specify all the immediate tasks that need to be completed before the task can start. |
| Immediate Successors Method | Specify all the successor tasks that need to be started after the task finishes. |
15.7.1 For the SrvRoom, we will need to make the following modifications.
- Change the Task Precedence Method to the “Immediate Predecessors Method,” as shown in Figure 15.36.

Figure 15.36: Task Precedence Method
- Modify the current task to represent the application review process, as seen in Figure 15.37. Set the task ID Number to 1. Since this task does not have any predecessors, Immediate Predecessors is left blank. Note that the worker is needed for this task and should be moved to the node TRoom. When this task is complete, the worker will be released. However, we will keep the worker reserved as it will be needed for the loan assessment task. Since the parallel task, “Request Records,” may take longer than the “Review Application” task, the precise time for the reservation length is unknown. So, we will specify Keep Reserved If as “True” and Reservation Timeout as “Infinity.”
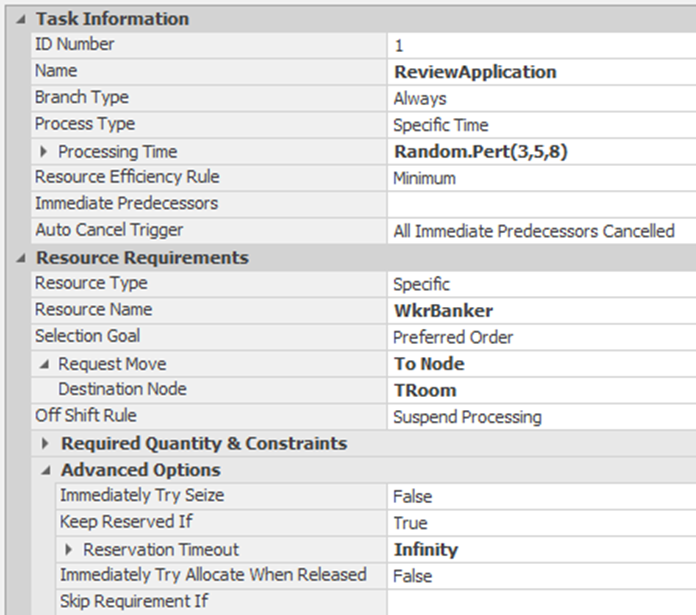
Figure 15.37: Review Application Task Information
- Add a second task named “RequestRecords” with task ID Number of 2. Recall the request records task only occurs 20% of the time, as seen in Figure 15.38, and requires no resources in the current scope of the model. Change the Branch Type property to “Independent Probabilistic,” as explained in Table 1.5. Again, we will use a property to represent the 20% of time a request is needed. Right-click on the Condition or Probability property and specify it to create a new property named GProbRecordCheck.
| Branch Type | Description |
|---|---|
| Always | Branch will be executed all of the time. |
| Conditional | Branch will conditionally be executed based on the expression independent of any other tasks (i.e., if the expression evaluates to true then the branch is executed otherwise it will be cancelled). |
| Probabilistic | Branch will be executed probabilistically based on the percentage value stated and is dependent on the other probabilistically branches at the same level. Probabilistic branching is mutually exclusive, meaning only one branch or none of the probabilistic branches will be executed. For example, consider a sequence with two tasks (e.g., task A and task B), each with sequence number 20. If Branch Type is set to “Probabilistic” for both task A and task B with Condition Or Probability values 0.25 and 0.4, respectively. Both task A and task B cannot be executed at the same time. The system will execute task A 25% of the time, task B 40% of the time, and neither task 35% of the time.248 Note the sum of all the probabilities at the same level cannot exceed 100%. |
| Independent Probabilistic | Branch will be executed probabilistically independent of other task branch probabilities. For example, if two tasks task X and task Y are specified as “Independent Probabilistic” with probabilities 0.4 and 0.7, respectively, one of the tasks, both of the tasks, or neither of the tasks may be required. Since the tasks are independent, the likelihood of both tasks being required is (0.4)*(0.7) = 0.28. |
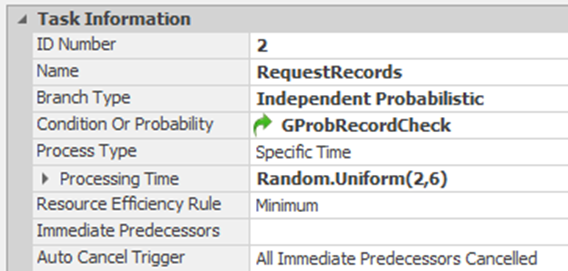
Figure 15.38: Request Records Task Information
- For the last task, add a third task, as seen in Figure 15.39. Specify the task ID Number of 3, the task Name to be “AssessLoan,” and Processing Time. Since this task requires both task 1 and task 2 to be completed before it can begin, specify the Immediate Predecessors as a comma-separated list of the task ID Numbers. Finally, recall that the loan assessment task requires the WrkBanker again. However, since the worker is already at the service location, we do not need to make a move request.
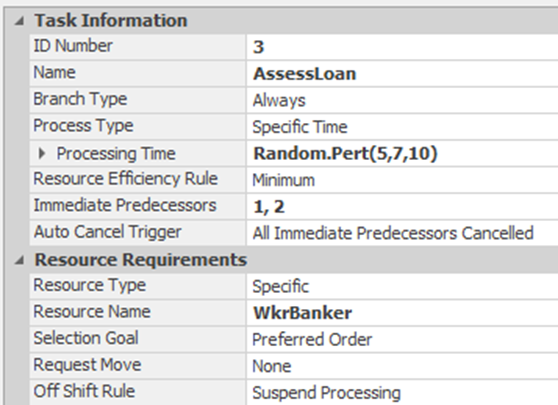
Figure 15.39: Assess Loan Task
- Once you close up the tasks, we need to make sure the GProbRecordCheck property is set to 0.2. Either right-click on the Model in the Navigation panel and select Properties or select somewhere in the model to access the Model properties under the Controls→General section, set the value to 0.2.
15.8 Some Observations Concerning Tasks
The addition of tasks to SIMIO is rather new, and their potential is still being explored. However, when a service activity needs detailed modeling, the task approach offers some interesting possibilities. For example, let’s assume the banker may have two primary sets of tasks: loan application (75% of the time) and other service visits (25% of the time). Also, for the Assess Loan task, 20% of the customers have issues and take longer to process. For our problem, we would like to model the more complicated set of activities to be performed by the banker at his office, as seen in the task sequence diagram in Figure 15.40.

Figure 15.40: Single Task Sequence Diagram
We will again use the “Immediate Predecessors Method” in this task sequence example. Even though for this set of tasks, some can be handled in a similar fashion as the last section (i.e., basic processing time and seizing of resources), we will demonstrate the use of the other process types as described in 2 to show the flexibility by using processes and submodels. We will use processes to model the “Other Services,” “Assess Loan” application, and the “Safety Deposit” tasks, and we will utilize a submodel for the “Request Records” task. For the “Review Application” task we will use the same Specific Time process type as well as for task 10, which will be a zero-processing time task needed to complement the probability of performing other services. These process-type options are explained in 2.
| Process Type | Description |
|---|---|
| Specific Time | Expression represents the time needed for the task to complete. |
| Process Name | Specify a process that will be executed when the task starts. The task will finish once the process has finished executing. |
| SubModel | Allows you to create a different model within the current facility window. When the task starts, an entity of a type that is specified will be created and sent to the starting node of the submodel. You can save a reference to the original entity to pass information to the created entity. The task finishes once the created entity is destroyed by the submodel. |
15.8.1 From the Definitions→Properties tab, insert a new “model” Expression property named GProbofLoanApp with a default value of 0.75 for the probability that a customer needs a loan versus other services. Repeat the process for GProbLoanAppIssues for the percentage of customers who have issues with their loan application, setting the default to 0.20.
15.8.2 As mentioned, we will utilize a submodel for the “Request Records” task, which is done in a different department once the banker submits it. In a different portion of the model, insert a new ModelEntity named EntRecordSearch, a Server named SrvRecordSearch, and a Sink named SnkFinishRecSearch, as seen in Figure 15.41.

Figure 15.41: Submodel for Request Records Department
Connect the SrvRecordSearch to the SnkFinishRecSearch via a connector, as we are not concerned with travel time.
For the Server, set the Processing Time property to be the same Random.Uniform(2,6) minutes to represent the time the department needs to process the request for record search.
15.8.3 For the three tasks (i.e., “Assess Loan,” “Other Services,” and “Safety Deposit Box”), we will create the processes that are associated with each task. Even though we could easily use the Resource Requirements to request the WkrBanker as before, we will Seize and Release the banker as part of the process because we can control when they occur for future enhancements.
- Insert a new process named TaskLoanApplication_AssessLoan, as seen in Figure 15.42. The Seize step should request the banker to the TRoom, as shown previously in Figure 15.5. The Decide step should use “ProbabilityBased” with the Condition Or Probability property expression sent to 1-GProbLoanAppIssues. Use the same Random.Pert(5,7,10) minutes for the loan assessment with loans with no issues and Random.Pert(10,12,15) minutes for the assessment of loans with issues. Then, release the banker, making sure to reserve the resource as in Figure 15.25, and then set the destination node of the customer to Input@SnkExit so this customer will be routed to the exit.

Figure 15.42: Process for Access Loan Task
- For the other services task, insert a process named Task_OtherServices. Copy all the steps from the previous process, changing the delay time to Random.Pert(4,6,8) minutes.

Figure 15.43: Process for Other Services Peformed by Banker
- Finally, for the task associated with the safety deposit, copy the Task_OtherServices process and rename it to Task_SafetyDepositBox, changing the delay associated with getting the key for the safety deposit box to Random.Pert(2,4,6) minutes.

Figure 15.44: Process for Safety Deposit Box
15.8.4 Since we have defined the task submodel and the task processes, we now need to implement the task sequence based on Figure 15.40, as seen in Figure 15.45. We will need to modify/delete the three current task sequences.

Figure 15.45: Submodel for Request Records Department
- From Figure 15.40, customers can take two potential sequence paths (i.e., loan application or other services). A Branch Type of Probabilistic will be used to select one of these two paths. Therefore, we need to insert a new task (10) named “LoanService” that takes zero time and has a Condition Or Probability value equal to GProbofLoanApp that allows the selection of that sequence path.

Figure 15.46: Submodel for Request Records Department
- Insert a new task (20) named “OtherServices” with 1-GProbOfLoanApp probability to ensure the customer selects either the 10 or 20 sequence task paths. Change the Process Type to “ProcessName” and set the Process Name property to “Task_OtherServices.”
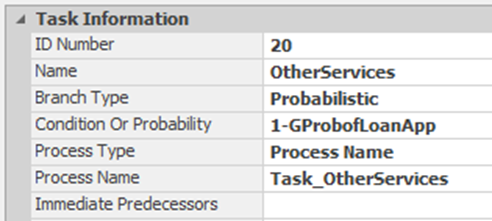
Figure 15.47: Tasks Associated with Other Services
- Modify the “Review Application” task as shown in Figure 15.48 by changing the sequence number to 30 and specifying the Immediate Predecessors as 10. The task will be executed only if the predecessor task is executed owing to the Auto Cancel Trigger property.
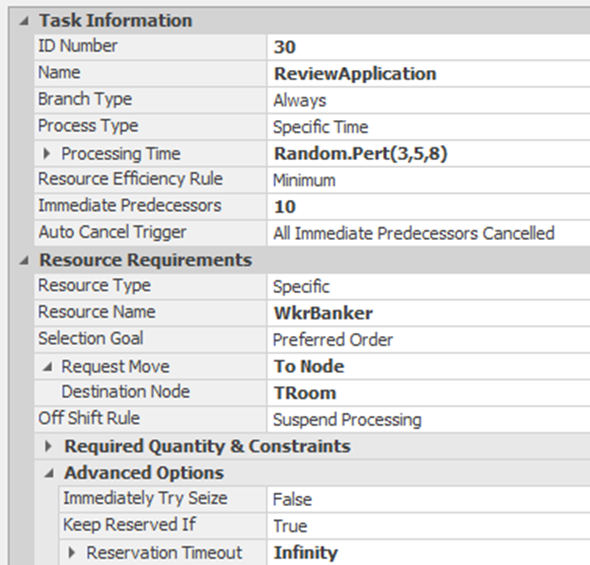
Figure 15.48: Task Associated with Review Application
- Modify the “Request Records” task to execute the submodel instead of using simple processing time as seen in Figure 15.49. Also, change the task number to 40 and specify the Immediate Predecessors as10.

Figure 15.49: Modification of the Request Records Task to Execute Submodel
- Modify the “Assess Loan” task by changing the task number to 50 and specifying the Immediate Predecessors as a comma-separated list of “30, 40,” as shown in Figure 15.50. Change the Process Type to “Process Name” and specify the TaskLoanApplication_AssessLoan process. Also, make sure to remove the Resource Requirements of the WkrBanker.

Figure 15.50: Modification of the Assess Loan Task to Execute Process
- Finally, insert a new task sequence with a sequence number equal to 60 and the Immediate Predecessors as a comma-separated list of “20, 50,” as shown in Figure 15.51. with and use the Task_SafetyDepositBox as the process. Also, make sure the Branch Type is “Probabilistic” with the Condition Or Probability set to GProbSafetyDeposit because only a percentage of customers perform this task.
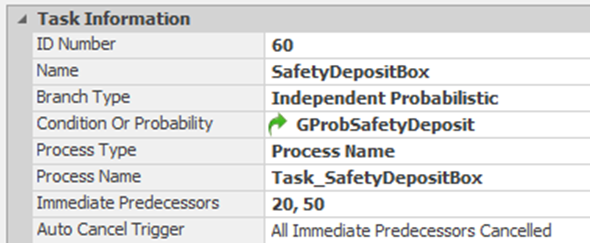
Figure 15.51: Task Sequence for Safety Deposit Box
15.8.5 Modify the SrvRoom_AfterProcessing as seen in Figure 15.52. Remove the Set Nodes because those are done in the task sequences. Modify the second Decide step based on the condition ModelEntity.DestinationNode == Input@SrvSafetyDeposit.
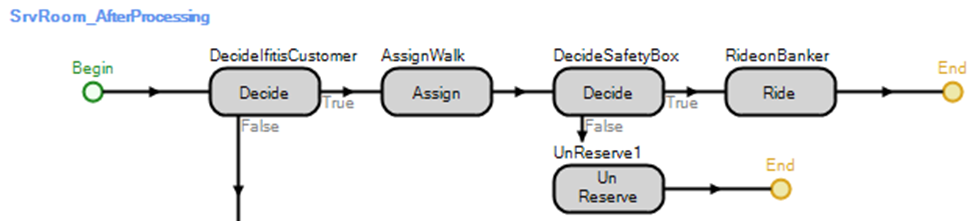
Figure 15.52: SrvRoom AfterProcessing
15.9 Commentary
- Using the vehicle or the worker for both transportation and service causes the model to become very expressive of the real system.
- Resource reservations make continued use of a resource convenient.
- Tasks and task sequences promote a detailed view of service activity and can incorporate a wide range of behaviors.
- The animated people show promise to greatly enhance the visual appeal of the animation.
- Tasks have two add-on process triggers (i.e., Starting Task and Finished Task). These processes can be used to record when tasks start and when they end to help calculate critical paths, earliest finish, latest start, etc.
- The general sequence number formation is X.Y.Y.Y, where X and Y are whole numbers. One only needs to define the X value (e.g., 10 and 20), which represents the root number of the sequence and helps to determine the precedence of the task. The Y’s are optional integer suffixes separated by periods that are added to the root sequence to define subsequences (e.g., 10.1 and 20.2). Table 15.7 discusses the rules associated with how the task sequence numbers to define the precedence of tasks.
| Rule | Description |
|---|---|
| Rule 1 | If the task sequence number has only a root number (e.g., 20), all tasks with lower task root numbers, regardless of suffixes, must precede that task (e.g., 10, 10.1, 10.2, 10.1.1 all precede tasks with sequence number 20). |
| Rule 2 | If a task A has a sequence number consisting of the required root number and one or more suffixes (e.g., 20.1, 20.2, or 20.1.1), then tasks with sequence root numbers that are less must precede task A provided they either have no suffixes (i.e., 10 would precede 20.1 or 20.1.1) or match all the suffixes (e.g., 10.1 precedes 20.1, 10.2 precedes 20.2, or 10.1.1 for 20.1.1). |
| Rule 3 | If a task A has a sequence number that has a root number followed by at least one suffix (e.g., 10.1 and 10.2 or 10.1.1 or 10.1.2), then all tasks with the same root number without any suffixes must precede task A (e.g., 10 would precede both 10.1 and 10.2). However, a task with sequence 10.1 does not precede 10.1.1 or 10.1.2, as these will all be considered starting at the same time. |
| Rule 4 | Note one or more tasks may have the same root sequence number with or without suffixes. For example, task A could have sequence number 20 and task B could have sequence number 20, which means these two tasks will start in parallel once the preceding tasks have finished. Starting at the same time is true for tasks with the same root sequence numbers followed by any number of suffixes (e.g., 10.1, 10.1, 10.1.1, or 10.1.2 sequence numbers all start at the same time). |
A Worker object must work “on demand” and has no routing type, meaning they don’t follow a specific sequence.↩︎
Select both paths and change the Drawn To Scale property to False and the Logical Length to be 15 meters simultaneously.↩︎
Symbols in the Library can be selected based on “Domain”, “Type”, and “Action”.↩︎
Symbols in the Library can be selected based on “Domain”, “Type”, and “Action”.↩︎
By holding down the Shift key while in 3-D mode will allow you to move the queue up and down. Once you have it on the floor, switch back to the 2-D view to position it beside the banker.↩︎
This node will be used as the node to visit in the Seize block. Note, the node that a worker or vehicle is dropping off entities cannot be the same node they need to visit. If the same node is specified, the model will result in a deadlock situation with the Worker/Vehicle stuck at the node and the Entity frozen in the InputBuffer and not able to proceed into processing.↩︎
Allocation as a Resource (i.e., responding to seizures) takes priority over handling ride requests from entities. If there is an entity that has requested a ride and one that has requested its service as resource, the vehicle will handle the resource request first.↩︎
We could have used the Secondary Resources section Resource for Processing that will seize and release the worker. However, in the next sections we will make modifications that cannot be done with Secondary Resources.↩︎
You will need to orient the desk by selecting the desk. While holding down the Ctrl key, grab one of the corners and rotate the desk around to the correct orientation.↩︎
The percentage is deliberately high to determine if the model is behaving correctly.↩︎
The Set Node step is identical to setting the Entity Destination property of a TransferNode (i.e., “Continue”, “Specific”, “By Sequence”, or “Select from List”). The Destination Type can be a “Specific Node”, choose the node in the next sequence (i.e., “By Sequence”) or a complicated expression.↩︎
In the previous chapter, the SeizedResources functions were used in the link weights to route the entities to either the exit or the X-ray machine.↩︎
Just copy the Release step from the SrvRoom_AfterProcessing to the SrvSafetyDeposit_ AfterProcessing.↩︎
In some process steps, the action can be applied to the parent object of the Token’s associated object (e.g., the Server the logic resides).↩︎
MinimizeReturnValue and MaximizeReturnValue search values will search the collection and return up to the limit of items specified that minimizes or maximizes the Return Value expression property.↩︎
The customer entity has also seized one unit of capacity from the Server and we do not want to return the Server object.↩︎
The Transfer step can be used to transfer dynamic objects (Agents, Entities, Vehicles, etc.) from Current Node, Current Station, Free Space, or Link to a specific Node, another station, Parents External Node, or outbound link.↩︎
If you transfer it directly to the TSafetyBox it will beam the banker there like Star Trek and not route it as this will take it out of the station and place in the Troom node which then cause the banker to move to the TSafetyBox node.↩︎
You can also remove the process trigger by selecting it and then deleting it. Removing the process trigger only removes the process from being invoked and does physically remove it↩︎
The SrvRoom_Processed is just the name of the process and can be easily changed. You could have created a new process trigger and then copied all the logic into the new process.↩︎
You could have copied and pasted another Release step after the Ride instead↩︎
Changing the Task Selection Strategy reorders the Rider Pickup Queue of the Vehicle.↩︎
The act of cancelling a reservation is called unreserving.↩︎
The worker will enter the node when they leave the parking station as well executing the “Entered” add-on process trigger. However, we do not need to add a Decide in the entered process because the Exited runs after the Entered making them walk.↩︎
Note that the TRoom and Input@SrvRoom nodes have two-way traffic and so the animation instructions are invoked in both directions. In this case, that is not a problem, but it could be in other instances.↩︎
If you wanted both task A and task B to be executed independent of each other, then set the Branch Type to “Conditional” with the Condition or Property value set to Random.Uniform(0,1) < .25 and Random.Uniform(0,1) < 0.4 respectively.↩︎