Simulation Modeling with Simio - 6th Edition
Chapter
13
Management of Resources: Veterinary Clinic
The Resource object provides a flexible means to model individual resource needs. Unlike the Server, the Resource does not provide a processing capability with input and output buffers at a specific location. Further, because the Resource object is not location-restricted, the units of its capacity can be used at several places within a model. Because the resource is flexible, its capacity can be allocated (i.e., seized and released) in a complex fashion. The management of a firm’s resources is one of the main challenges of any organization. A simulation of that management can greatly assist in determining how those resources can be best used.
To illustrate part of the resource management capability, a Veterinary Clinic is modeled. The veterinary clinic provides care for many different kinds of animals. The office wants to provide efficient care through the employment of efficient resources. For simplicity, we primarily model the activities of the veterinary staff. The staff consists of four veterinarians named (first names) Billy, Jim, Maisy, and Ellie. Several factors complicate this clinic service. There are times when multiple types of resources, such as a Veterinary staff member and an X-ray machine, are required before the patient is serviced. There are certain preferences for resources, such as Jim being the only veterinarian who can service iguanas. The Server object cannot handle these cases easily. For instance, you may need a nurse and doctor to perform a procedure and then need the nurse for some after-procedure service.
13.1 Utilizing the Fixed Resource Object
The Resource object is a capacitated “Fixed Object” (i.e., it does not visibly move in the network similarly to the TransferNode or Source objects) and can be seized and released. It does provide a generic object that can be used to constrain entity flow. Resources have reliability capabilities and the ability to statically and dynamically rank and select the entities for processes (i.e., process all critically ill patients first). They can also choose to remain idle under some conditions. (i.e., refuse to be seized).
13.1.1 Create a new fixed model (“Project Home” tab). Note that you can have multiple models in the same project, but only one will run in Figure 13.2.
13.1.2 Add a new Source named SrcPatients, a Server named SrvVetClinic, and a Sink named SnkExit. Add a ModelEntity named EntPatients. Connect the objects with paths that are logically 30 meters long.170
- Patients arrive Exponentially with an interarrival time of 6.5 minutes.
- Each patient takes between 10 and 30 minutes to be seen by the staff, with most patients taking 15 minutes to be served (i.e., use a Pert distribution to model the processing time).
13.1.3 From the Standard Library section, add a new fixed Resource171 named ResBilly.
- Since Resources have reliability logic, we can use it to model emergency phone calls for the vets. Specify the Uptime Between Failures to follow an exponential distribution with a mean of six hours and Time to Repair expression equal to a Random.Pert(40,55,60) minutes, as shown in Figure 13.1.
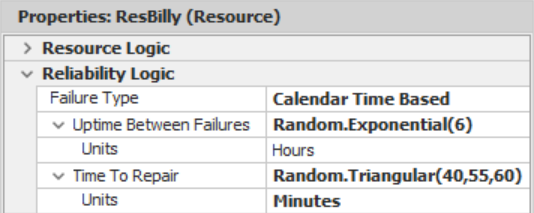
Figure 13.1: Reliability Logic to Handle Emergency Calls from the Veterinarian
- Like the servers, the resource symbol changes as its state changes. If you click on ResBilly and examine the “active symbol,” there are seven resource states. The first five states are the same as those for servers, but there are two additional states (i.e., “Failed Busy” and “Off Shift Busy”). The symbols change colors, while the iris remains blue (i.e., the color is red when a resource fails). Similar to the server states (see Chapter 8), the resource states have a name, color, and state number.
- Like the servers, the resource is idle (state 0) when all the capacity of the resource is idle, is busy when any of the capacity is being used, blocked whenever the resource is presented from disengaging from an entity, failed whenever the reliability causes a failure of the resource, and offshift when the capacity of the resource is zero.
13.1.4 Copy the ResBilly resource instance three times, naming them ResEllie, ResJim, and ResMaisy
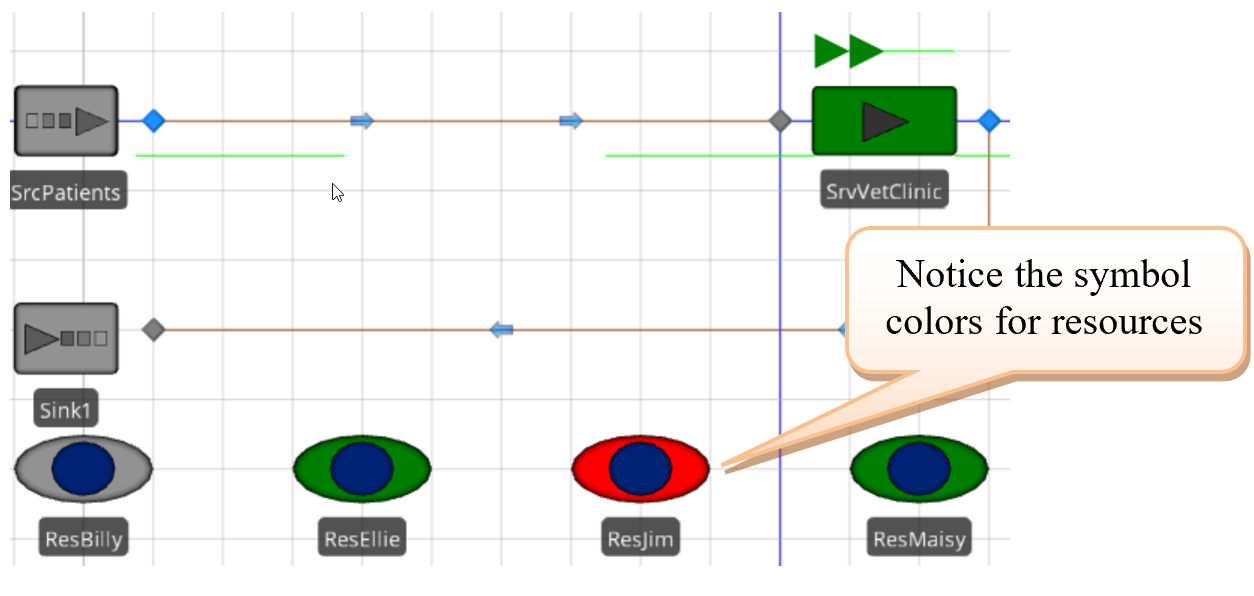
Figure 13.2: Model of the Veterinary Clinic Using Four Resources
13.1.5 Change the capacity of the Server SrvVetClinic to Infinity so the Server’s capacity does not constrain the system. We want the new resource objects to be the constraining requirement.
13.1.6 At this point, we can seize an individual Resource, but our model will require selecting among any available staff member rather than a specific resource. Go to the “Definitions” tab of the model and create a new List of Objects named ListResources. Next, add all four resources to the list, as seen in Figure 13.3. Patients will use this list to select an available veterinary staff.
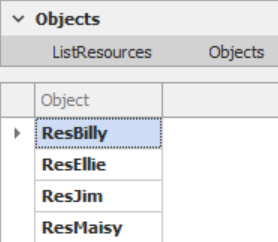
Figure 13.3: Creating a List of Resources to be Seized
13.1.7 The basic model has been set up with fixed Resources; however, the patients need to request (seize) an available staff member to be serviced and then, once they have completed service, need to release the staff member to work on the next patient. Patients will request a staff member when they arrive at the Vet Clinic. Two Add-On Process Triggers for the Server will be used.
13.1.8 The patient entity needs to seize one of the available resources before entering processing (i.e., the “Before Processing”172 trigger). To invoke the”Before Processing” add-on process, expand the “Add-On Process Triggers” in the properties window and double-click on the label to invoke/create a process.173
13.1.9 Since the patient wants to seize the resource, insert a Seize step by selecting from the list of possible steps and dragging it between the Begin and End nodes, representing where the process starts and ends, as seen in Figure 13.4.
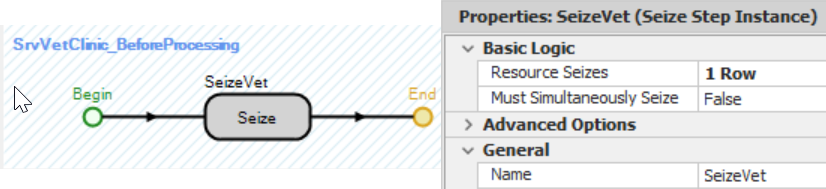
Figure 13.4: Using a Seize Step to Request a Veterinary Staff Member
- Under the “General” properties of the process step, as seen on the
right side of Figure 13.4, set the Name to SeizeVet. The
resources to try to seize will be specified under the “Basic Logic.”
Click on the
 button in the property window in the
Seizes property row, which currently indicates that one type of
resource has been specified as being seized.
button in the property window in the
Seizes property row, which currently indicates that one type of
resource has been specified as being seized. - The Seize – Repeating Property Editor (see Figure 13.5) will pop up and allow you to specify as many resources that need to be seized before the entity can be processed. In this example, we will specify one resource type, and the Object Type will be “FromList“174 which can be selected from any of the resources in a list (i.e., ListResources).
- We do not want to select a resource that is currently failing, so the Selection Condition property has to evaluate to true for each resource in the list for the resource to be considered as a possible choice to be seized. Therefore, set the property to !Candidate.Resource.Failure.Active.175
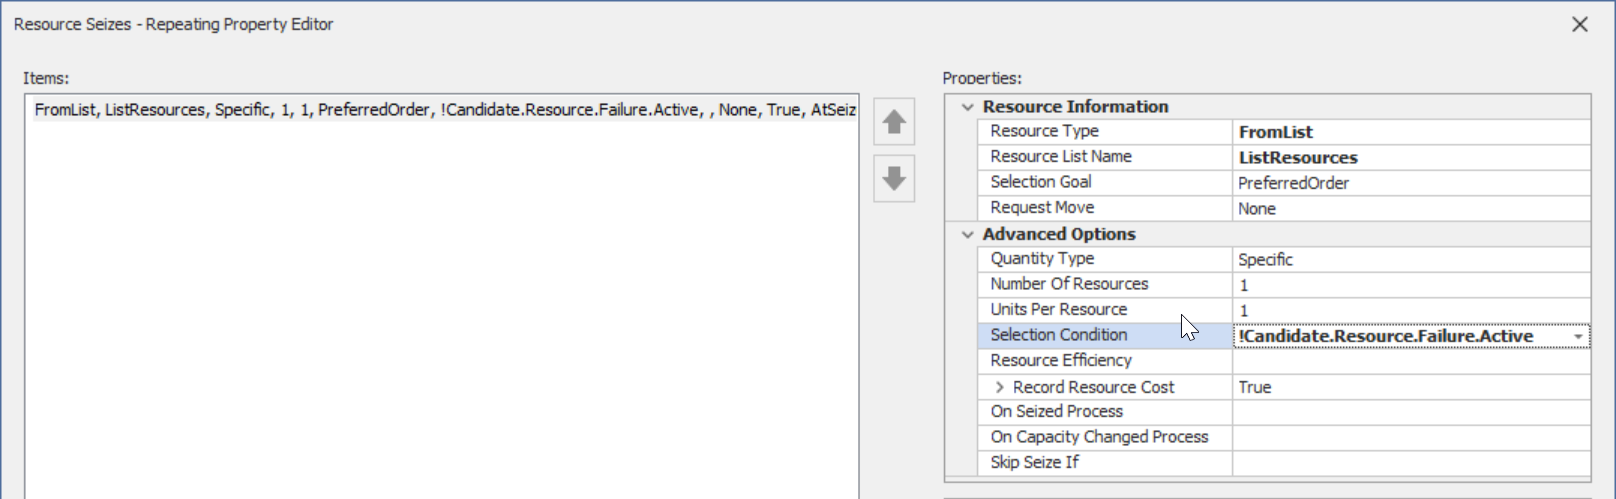
Figure 13.5: Seize Property Edito
13.1.10 The patients are now able to Seize the clinic staff, but once the patient has finished processing, the entity (patients) will need to release the staff members (resource). There are two potential triggers (i.e., “After Processing” or “Exited”). Insert a new “After Processing” add-on process trigger by double-clicking on the label to invoke/create a process that will be executed once the process has been completed before exiting.
- Insert a Release step into the process between the Begin and End nodes, allowing the patient to release the resource seized, as seen in Figure 13.6.
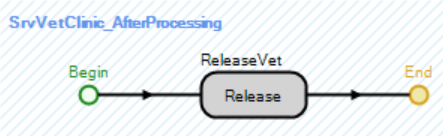
Figure 13.6: Using a Release Step to Release a Veterinary Staff Member
- Repeat a similar process to the Seize step, naming the step ReleaseStaff and specifying the Releases property. Identical to the Seize Editor, the Releases → Repeating Property Editor will allow one to release resources according to the release properties.
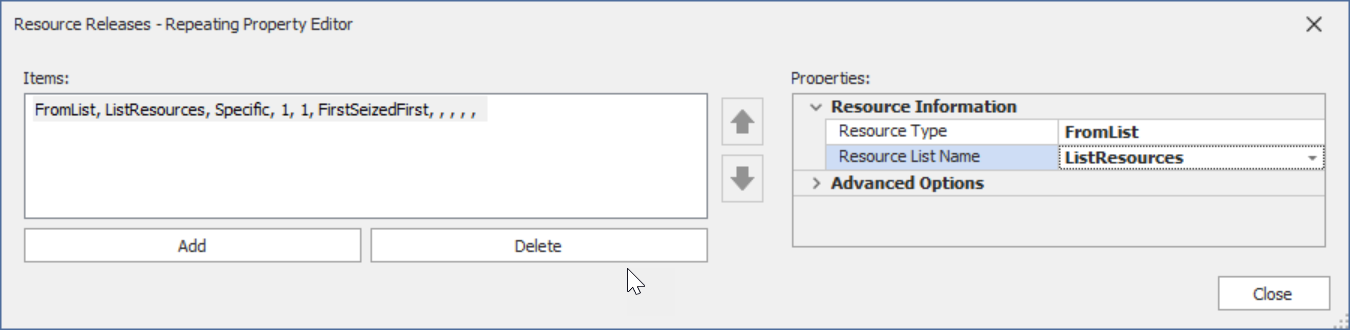
Figure 13.7: Release Property Editor for the Release Step
13.1.11 Save and run the model for 40 hours and observe what happens.
13.1.11.1 What is the overall average utilization for each of the Resources, and why does Billy have the highest utilization?
_______________________________________________
13.2 Different Resource Needs Based on Different Patient Types
The previous model assumed all clinic vets could see all patients. However, suppose Billy and Maisy have expertise with birds while Jim has expertise with iguanas, but if he is busy, Ellie can provide the service. Horses and cows are troublesome animals owing to their size and require two veterinarians. All other animals (cats and dogs) can be seen by any one of the veterinarians.
13.2.1 Create a new data table named TableAnimals that has a “String” column(property) for the animal name, an “Integer” column for the animal type, and a “Real” column for the percentage of time this type of animal typically arrives to the clinic. The entry values are shown in Figure 13.8. For example, 25 percent of the time, large animals representing cows and horses will arrive at the clinic.

Figure 13.8: Table with Animal Information and Types
13.2.2 Create two new Object lists named ListBird and ListIguana in a similar manner to ListResources in Figure 13.3, which represents the staff that can service these specialty animals as seen in Figure 13.9.

Figure 13.9: bject Lists for the ListBird and ListIguana
13.2.3 Add three additional symbols to the patient entity to distinguish between the various animal types. One can use four different colors, but you can also use interesting pictures of these creatures by downloading symbols from Trimble 3D Warehouse, as seen in Figure 13.10, which shows the four symbols horizontally (instead of vertically). Note that the order of the symbols should correspond to the type column in Figure 13.8.176

Figure 13.10: Trimble 3-D Warehouse Downloaded Dog, Cow, Bird, and Iguana Symbols
13.2.4 The goal will be to randomly assign the animal types and pictures (color) based on the historical percentages. The assignment must be done after the entity has been created using the “Created” add-on process trigger in the Source. Insert a new “Created” Add-On Process Trigger177 , which will be executed once the entity has been created by the SrcPatients.
- One of the features of SIMIO is the ability to associate one or more tables and/or rows of a table with an entity. Our newly created patient needs to be associated with a specific row of the TableAnimals data table, and the correct picture symbol must be assigned based on the “Animal Type” column. Insert a Set Row and an Assign process steps into the process, as in Figure 13.11.178
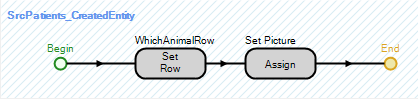
Figure 13.11: Determining Patient Type by Setting a Row of Datatable to Entity
- Specify a specific row of the associated table randomly using the RandomRow method based on the “PercentType” column, as seen in Figure 13.12.179 Also make sure the Object Type under the Advanced Options is set to the “AssociatedObject”.180
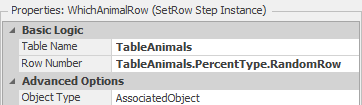
Figure 13.12: Release Property Editor for the Release Step
- Once an animal type has been determined, Figure 13.13 shows the properties of the Assign process step used to assign the associated “Type” column from the table to the picture symbol state of the ModelEntity.181

Figure 13.13: Changing the Picture of Entity to Reflect a Column in an Assigned Datatable
13.2.5 Save and run the model to ensure the different animal types arrive as expected. You may need to adjust the animated processing queues to allow the large animals to be visible.
13.2.6 The patients still seize any vet regardless of animal type, and only one staff member is seized. Therefore, we need to modify the Add-On Process trigger for seizing and releasing resources to incorporate the resource requirements (See flow chart in Figure 13.14),
- If the type is cat/dog or horse/cow, we can choose any resource, but for horse/cow patients, two resources are needed.
- If the type is a bird, we need to choose a resource from the Object List ListBird.
- Finally, if the type is an iguana, we will need to choose from the Object List ListIguana.
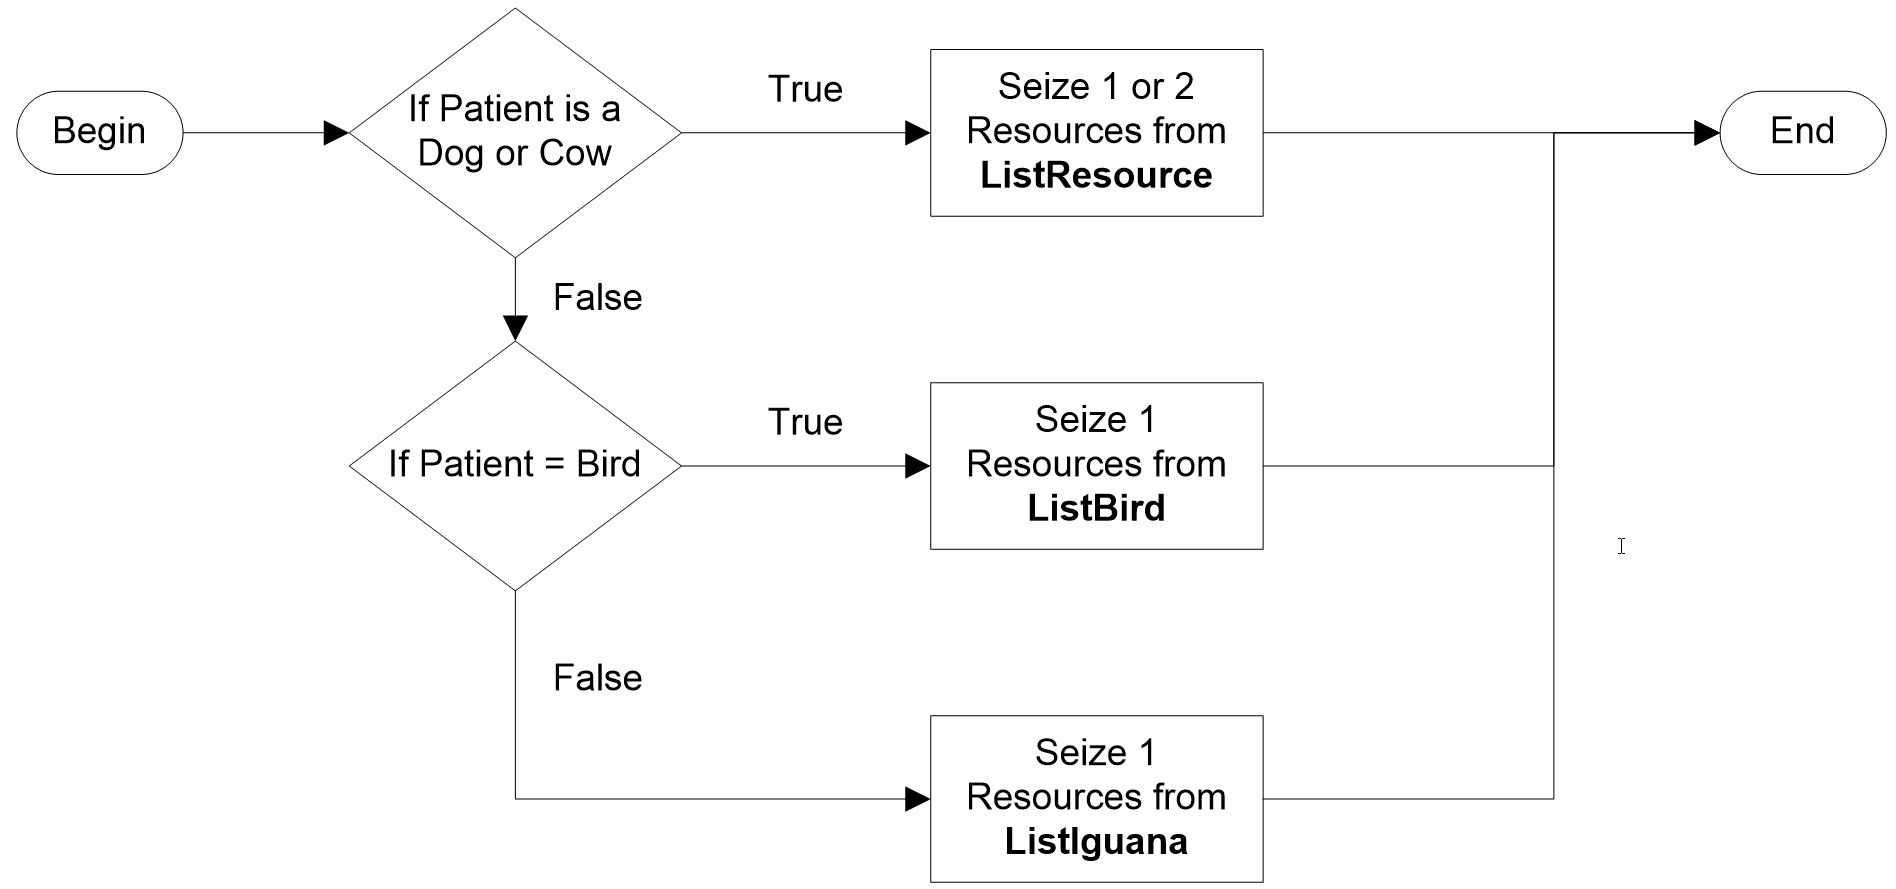
Figure 13.14: Seizing the Appropriate Veterinary Staff Based on Patient Type
- We need to make some decisions based on the animal type to perform the logic, as seen in the above flow chart. The logic is performed by a SIMIO Decide process step (see Figure 13.15), which is basically an If/Else statement with a True and False branch. In Figure 13.14, the Decide step’s two major properties of interest are the Decide Type and the decision Expression.
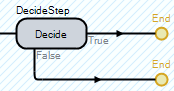
Figure 13.15: SIMIO Decide Process Step
Figure 13.16 shows the modified “Before Processing” add-on process trigger that will seize the appropriate staff members based on animal type.182
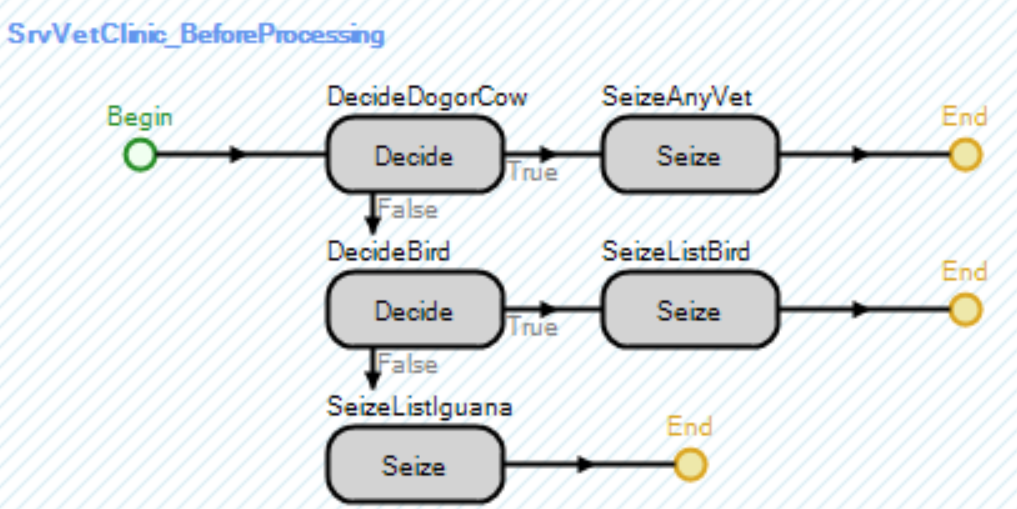
Figure 13.16: Seizing the Appropriate Resource Based on Animal Type
- Insert a Decide step before the current Seize step, which will determine if the patient is a dog/cat or cow/horse. Based on which is true, the patient will seize from the resource object List ListResource as before. Specify the Decide Type to be condition-based with an expression that checks to see if the animal type is a 0 or 1 (see Figure 13.17). 183

Figure 13.17: Specifying the CondtionBased Expression of a Decide Step
- The second Decide step will check whether it is a bird. (Hint: copy the first Decide block, paste it onto the False branch, and change the expression to (TableAnimals.Type==2.
- Copy the Seize step to both the True and False branches of the second Decide step. You must change which resource list the entity will seize from (i.e., ListBird and ListIguana, respectively).
- The first Seize step is already set up to seize from all the resources (ListResources). However, by default, it only seizes one object. However, two resources are needed for large animals. There are several ways to model the logic. Since the animal type of cats/dogs is zero and cows/horses is one, the type can be added to one to give a result of one or two. In the Number of Objects184 property to seize, the following Figure 13.18 illustrates the expression of seizing one or two objects based on the animal type.
13.2.7 Change the SrvVetClinic’s processing animated queue alignment to “Oriented Point.” Then, add two more vertexes and orient all four toward the Server, as seen in Figure 13.19
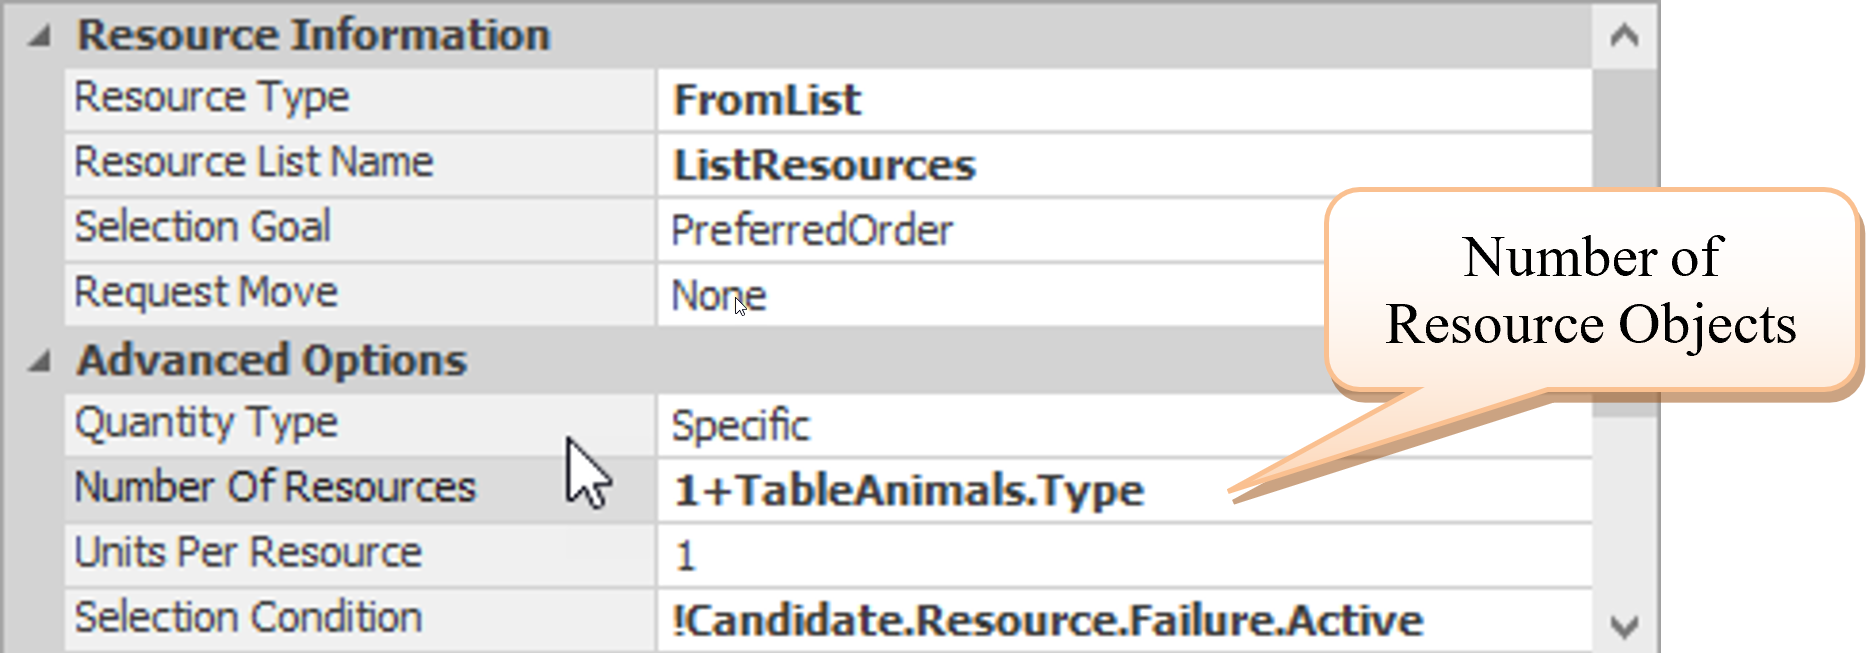
Figure 13.18: Specifying an Expression to Determine the Number of Resources to Seize
13.2.8 Save and Run your model. You may need to experiment with the percentages to ensure the correct staff members are servicing the animals. Figure 13.19 shows a cow being serviced by both ResBilly and ResEllie.
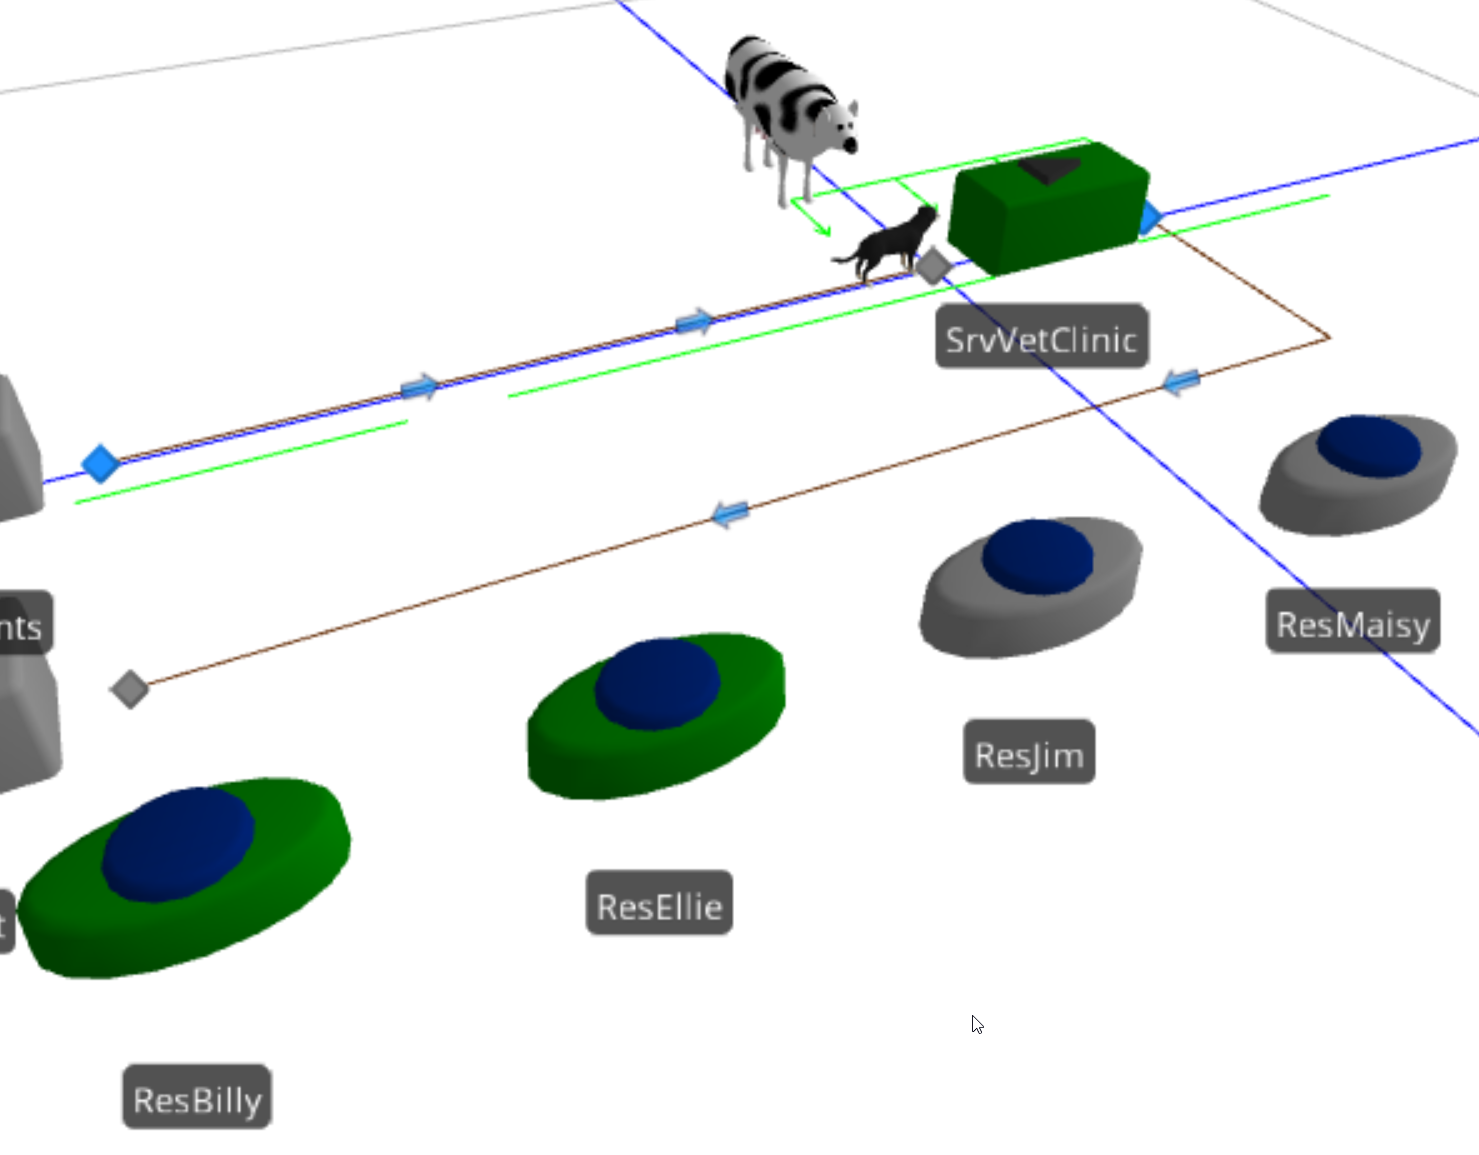
Figure 13.19: Using Two Resources to Service a Large Animal
13.2.9 The only thing left to do is to release the veterinary staff once they have finished processing the patient. It is similar to the “Before Processing” trigger but uses Release instead of r fontc(“Seize”)` steps. It is important that you release the correct number of objects back to the ListResources pool.
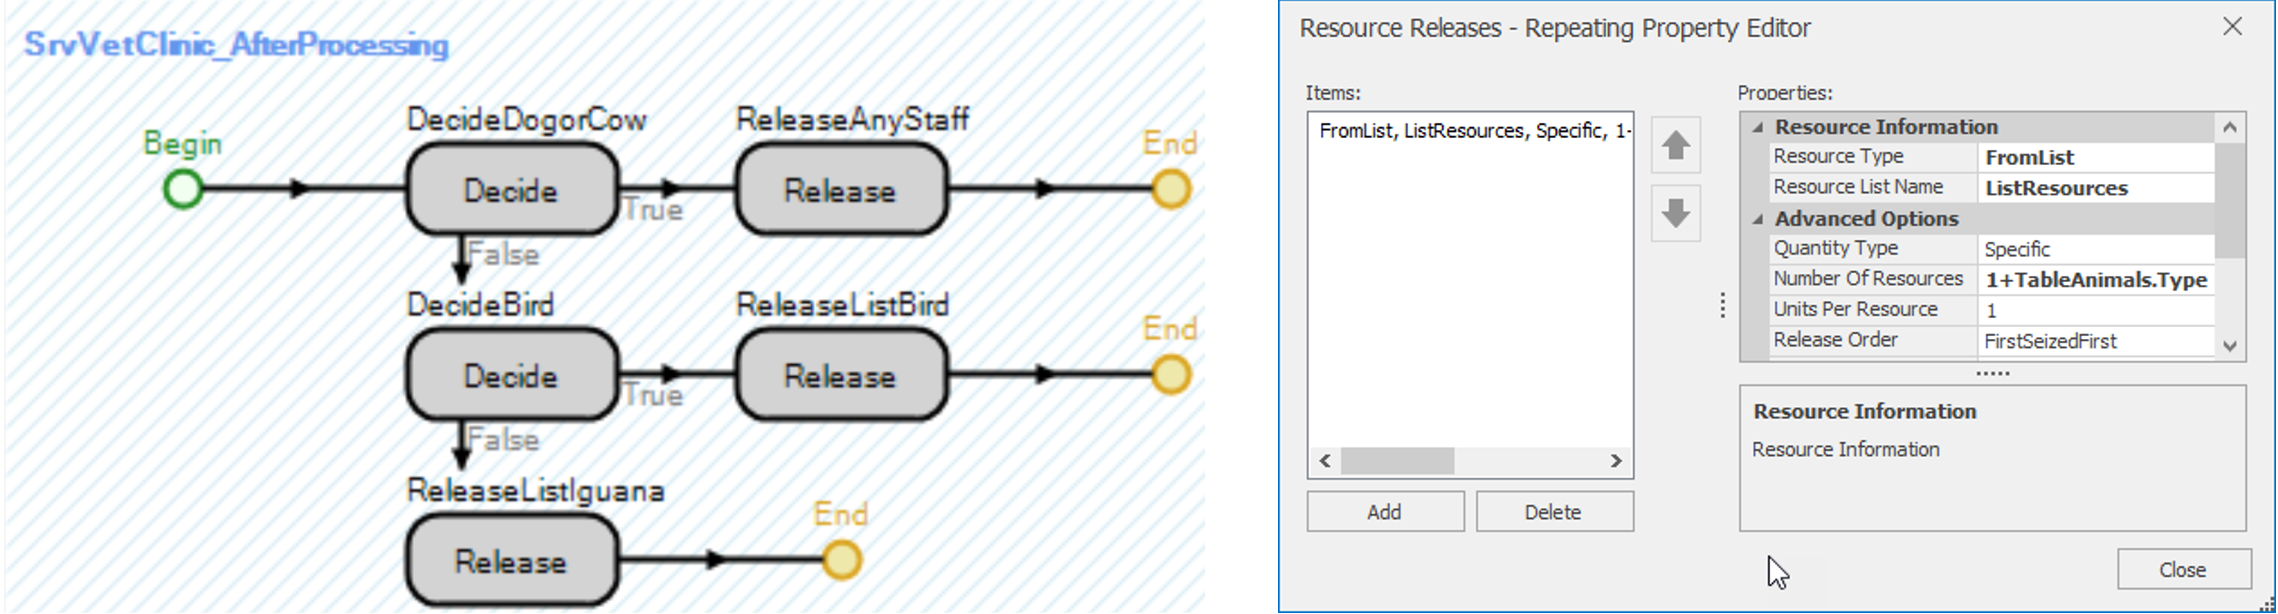
Figure 13.20: Releasing the Correct Vet to Appropriate Resource Set
13.2.10 Save and Run your model and observe what happens (see Figure 13.21).
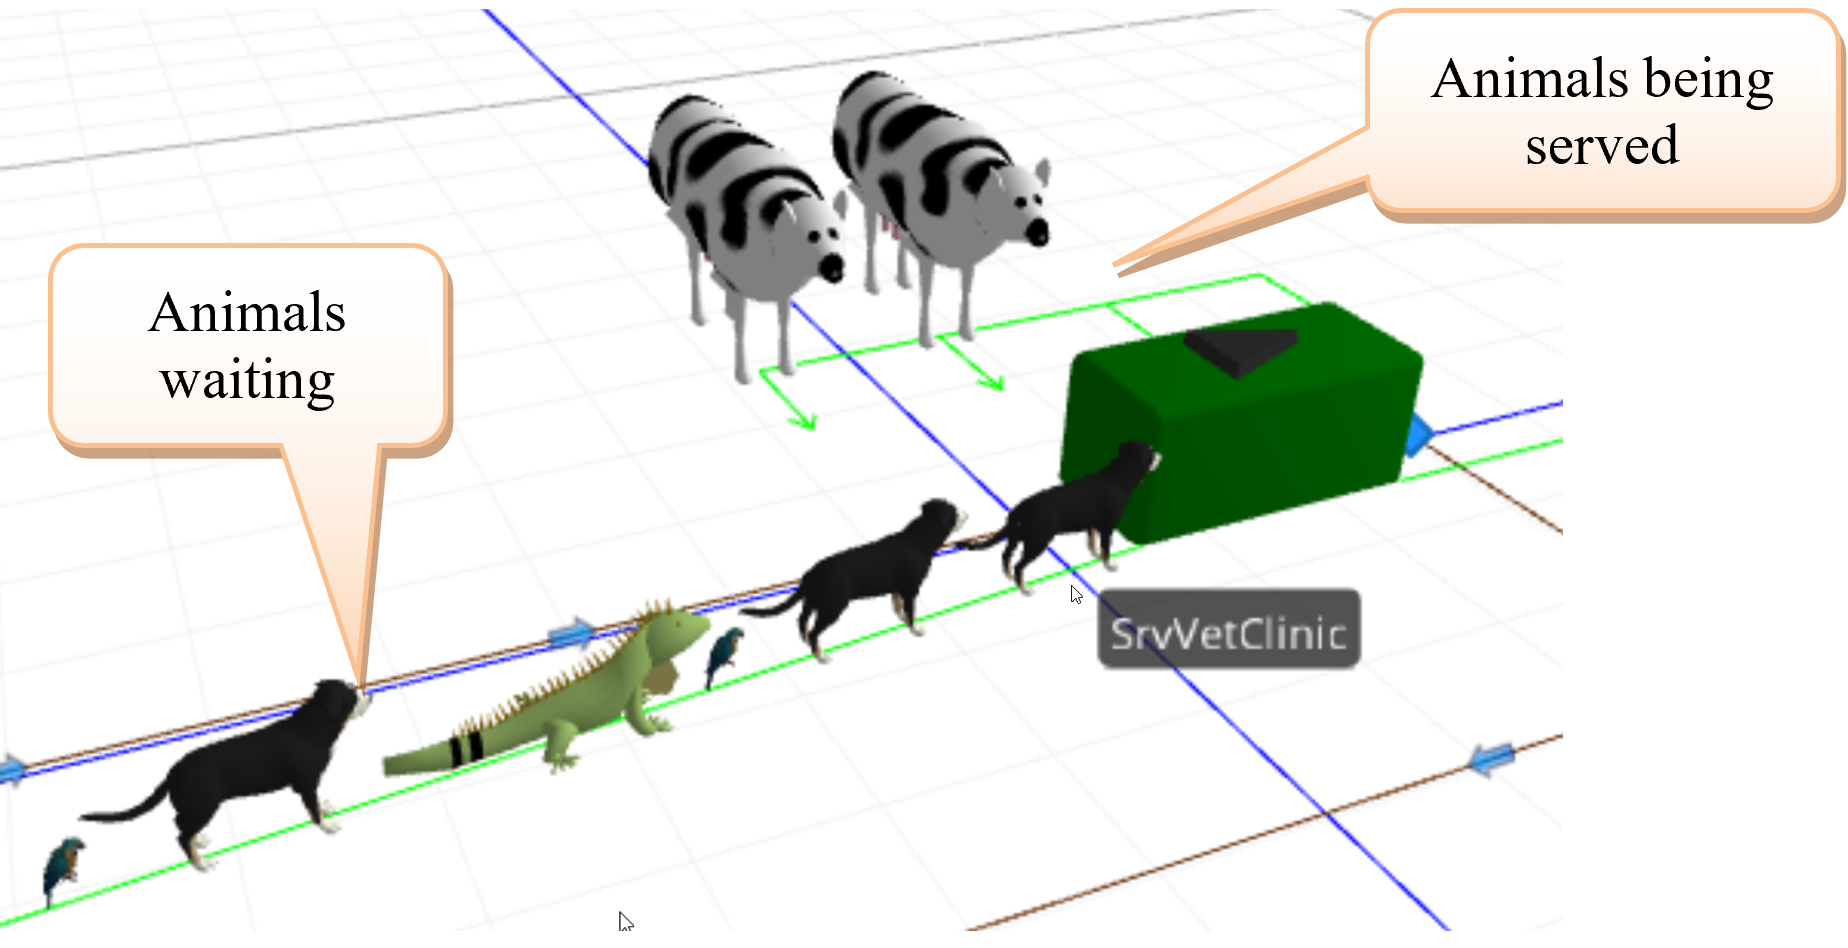
Figure 13.21: Figuring Showing Animals being Serviced and Waiting
13.2.10.1 What is the overall average utilization of each of the Resources?
_______________________________________________
13.3 Resource Decision Making
One of the most prominent features of SIMIO is that you can model very complex logic (e.g., process steps) or expressions and supplement it by associating information via data tables on entities. In an earlier chapter, the processing time and routing information for different part types were linked directly to the part itself. When parts arrived at the Servers, the server would ask the entity how long it took to process them. Many simulation languages, including SIMIO, have the ability to specify attributes (i.e., entity state variables in SIMIO), which can be assigned the actual processing time value when the entity is created. However, SIMIO information in a data table can be dynamically changed for any object to reference it. In the current example, there are four different animal types. What if the number of types increases to ten with eight or nine different lists to seize the correct vet? The decision logic would get very complicated and long. Therefore, we have the ability to make the objects more intelligent (i.e., they know the list and the number required for service).
13.3.2 Recall that only the animal Type column was utilized previously to make decisions. Now modify the data table TableAnimals by inserting a new “Integer” column from the Standard Property dropdown. Name this column NumberStaff to represent the number of vets required by the animal type. Next, add an Object List column from the Object Reference dropdown named ListStaff, which will represent the list of the resources that can be selected. Set the values of the rows according to the ones in Figure 13.22. Now, the patients know which group of people can service them and the number of patients they need.

Figure 13.22: Including the Number of Staff Needed in the TableAnimals
13.3.3 In the “Processes” tab, remove all the steps except one Release and Seize step in the “Before Processing” and “After Processing” add-on triggers, respectively, as seen in Figure 13.23.185
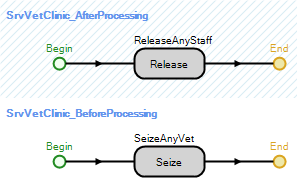
Figure 13.23: Improved Process Logic for Seizing and Releasing Vet Staff Members
13.3.4 Modify the Seize and Release properties to utilize the referenced/associated table properties. On the Object List Name and Number of Objects, right-click and set the Referenced Property to the correct column of the table. Now, when a patient arrives to seize a staff member, it will dynamically seize the appropriate number from the correct group of resources.

Figure 13.24: Seize and Release Properties using Referenced Properties
13.4 Adding an Additional Process
Sometimes, the patients need to have an X-ray taken, which is located in a different room. For example, 25% of cats and dogs typically need X-rays, while only 15%, 0%, and 2% of cows and horses, birds, and iguanas, respectively, do. The patients will leave the care rooms and move to the X-ray machine room. The veterinarians will accompany the patients to perform the X-ray. Afterward, the veterinarians will be released to serve other patients.
13.4.1 Add an additional Server named SrvXrayMachine, as seen in Figure 13.25.
- Set the capacity of the Server to one since there is only one machine
- The processing time to perform and read an X-ray follows a Pert distribution with minimum, most likely, and maximum values of 20, 25, and 35 minutes, respectively.
- Make the alignment of the processing animated queue to “Oriented Point.”
- Connect the output of the X-ray machine to SnkExit via a 30-meter logical Path.
- Connect a 10-meter logical Path from the SrvVetClinic output to the input of the SrvXrayMachine.
13.4.2 Since each animal type has a different chance of needing an X-ray, add an additional Real column named XrayLabPercentage to the TableAnimals, as seen in Figure 13.26.

Figure 13.25: Adding an Additional Process that uses Resources Already Seized
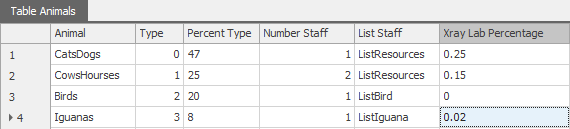
Figure 13.26: Animal Percentages of Needing an X-ray
13.4.3 If the patient needs an X-ray, the staff member(s) should not be released immediately after the patient care service. The entity should move to the X-ray station Server, where they will be processed in the order they arrive. Once they have completed the X-ray process, the staff members are released back to the pool of available veterinarians, and the patients will exit. The first step will determine whether the patient should release the staff members (i.e., a Decide process step will be needed). In the “After Processing” add-on process trigger of the SrvVetClinic, insert a Decide process step. Move the Release step to the “False” branch (see Figure 13.27) so that the staff is not released if an X-ray machine is needed.
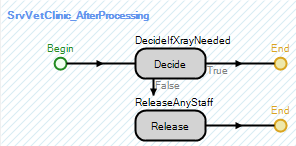
Figure 13.27: Modified Processed Process Trigger
- The Decide step is shown in Figure 13.28.

Figure 13.28: The Decide Step
13.4.4 If the patient needs an X-ray, they release the staff members after the X-ray has finished processing them. Insert a new process for the After Processing add-on process trigger for the SrvXrayMachine. Copy and paste the Release step block from the SrvVetClinic_AfterProcessing process to the new process.
13.4.5 Now, patients needing X-rays must be routed to the new Server. By default, the patients will randomly go 50% of the time to the sink or the X-ray machine’s input, owing to one’s equal link weights.186 Numerous functions (i.e., f(x) designation in the expression editor) are associated with the various objects. Table 13.2 gives a description of the SeizedResources family of functions. The base function of SeizedResources, which gets access to the objects that any intelligent object has seized, will invoke the underlying function SeizedResources.NumberItems
| Function | Description |
|---|---|
| SeizedResources. NumberItems | This function will return the current number of objects (e.g., Resources, Servers, Link capacities, etc.) seized and owned. |
| SeizedResources.FirstItem | All object instances in a SIMIO model have a unique numeric identifier (ID) (e.g., Nodes, Servers, Resources, etc.). This function will return the reference of the first object in the list of objects currently seized and owned by this object. |
| SeizedResources.LastItem | This function will return the reference of the last object in the list of objects currently seized and owned by this object. |
| SeizedResources. ItemAtIndex(index) | This function will return the object’s reference in the list of objects currently seized and owned by this object at the specified index. |
| SeizedResources. IndexOfItem (resource) | This function will return the index of a specified resource in the list of resources currently seized and owned by this object. It will return zero if the resource has not been seized. |
| SeizedResources. CapacityOwnedOf(resource) | This function will allow you to determine the number of units of capacity for a specified resource that is currently owned by this object (i.e., it would return two if they had seized two hammers). |
| SeizedResources. Contains(resource) | This function returns True(1) if the list of resources currently seized and owned by this object includes the specified resource. Otherwise, the value False(0) is returned. |
| SeizedResources. RequestedDestinationNode (resource) | This function returns a reference to the requested destination node for a specified resource in the list of resources currently seized by this object. |
| SeizedResources. AggregateEfficiency(type) | Calculates and returns an aggregate efficiency value for the list of resources currently seized by the object. The aggregate type is an integer argument. Possible values: 0 = None, 1 = Average, 2 = Count, 3 = Maximum, 4 = Minimum, 5 = Sum. |
- Specify the link weight of the path leaving the SrvVetClinic and going to the exit (SnkExit) to be ModelEntity.SeizedResources.NumberItems == 0, which means the patient has released the staff members and can exit the system.
- Specify the link weight of the path leaving the SrvVetClinic and going to the X-ray machine (SrvXrayMachine) to be ModelEntity.SeizedResources.NumberItems > 0, which means the patient has still seized staff members because the patient needs to have an X-ray done.
- Note that the link weights will evaluate to one or zero thus forcing the patients to take the path only if the link weight was a one.
13.5 Changing Processing Based on Animal Type and Vet Servicing
At this point, all of the animal types take the same amount of time to be seen by one of the vets (i.e., processing time is sampled from the same distribution). However, depending on which animal type and vet is seeing the animal, the time to be seen can vary. This is a common situation where the time depends on the resource seized (i.e., doctor, nurse, etc.). Recall that relational data tables were used previously to specify a different processing time for each part type for each of the operations in the sequence. This method works well for distinguishing processing times among different part types (i.e., animal types). Therefore, a child table containing the processing times will be created to allow the processing time to become also dependent on the resource being employed.
13.5.1 First, select the Type column in the TableAnimals and make it the table’s primary key, as seen in Figure 13.29. This table will become the parent table, and the child table will inherit the values.

Figure 13.29: Specify the TableAnimals Type Column as a Primary Key
13.5.2 Next, add a new data table named TableProcessingTimes via the Data→Tables→Add Data Table button as seen in Figure 13.32.
- Add a new Standard Expression Property column named ProcessingTimes, as seen in Figure 13.30 making sure to set the properties Unit Type to “Time” and Default Units to “Minutes.”187
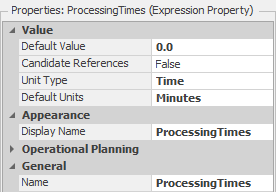
Figure 13.30: Specifying the Processing Time Column
- Next, add a new Foreign Key column named Type with the Table Key property set to TableAnimals.Typeas seen in Figure 13.31.
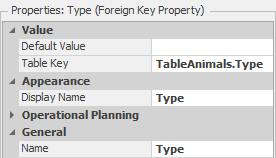
Figure 13.31: Specifying the Foreign Key to inherit Column from Parent Table
- At first we will utilize constant times for each of the animal services. Set the time to 30, 60, 20, and 40 minutes for dogs, cows, birds and iguanas respectively to correspond to Figure 13.32.
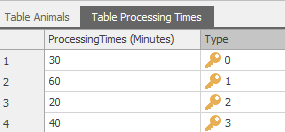
Figure 13.32: Processing Time Table for the Different Animal Types
13.5.3 Next, we need to utilize the new processing time information in the model. Unlike prior cases where we were using the next sequence of the Transfernode to set the particular row in the child table, we will need to specify it directly (i.e., set the Processing Time property for row one by TableProcessingTimes[1].ProcessingTime of SrvVetClinic). Without the relational table, the expression would always be set to the first entry in the whole table. Since this is a related table, it will set it to the first entry of the inherited rows which currently only has one row as seen in Figure 13.34 which shows for child table for an entity which has been assigned a bird. 188

Figure 13.33: Setting the Processing Time to be the First Row of the Child Table
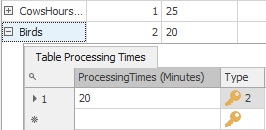
Figure 13.34: Showing the Child Table Associated with the Bird Row
13.5.4 At this point, we could run the model, but it may be difficult to determine if the processing time is being assigned correctly.189 Therefore, we will set the priority190 state variable of each entity to reflect their processing time. In the SrcVetClinic_Processing process, insert an Assign step after the Seize step to set the patient’s Priority state variable, as seen in Figure 13.35.191

Figure 13.35: Specifying the Processing Time for Display Purposes
13.5.5 In order to see the set priority value, we will add a status label to the animal that displays the processing time for each animal.192 Select the ModelEntity EntPatients and then insert a new Animation→Status Label, which associated/attaches the label to the entity. Specify the expression of the label as the entity’s priority state variable.
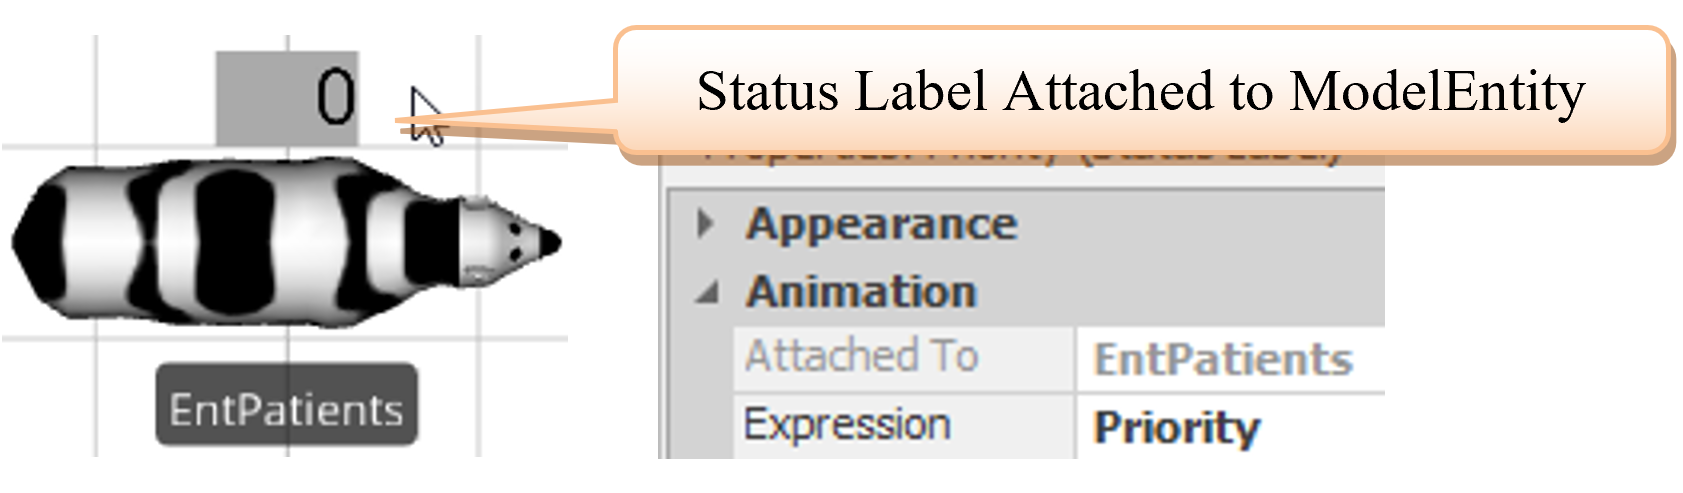
Figure 13.36: Inserting a Status Label Attached to the Entity
13.5.7 Now, the model can handle the processing time based on the animal type. In many situations, the processing time may also depend on the resource (i.e., vet) you have seized. The notion of position within the list of resources will be used to determine the processing time. First, select the ModelEntity in the [Navigation] panel and add a new Discrete Integer state variable from the Definitions→State section named EStaWhichRes. This state variable will be assigned the position of the resource that has been seized in the particular resource list.
For example, if a current patient who is a dog has seized Ellie from the ListResource list the patient’s EStaWhichRes variable would be assigned a value of “2” to correspond that ResEllie is in the second position of this list as seen in Figure 13.37.

Figure 13.37: Illustrating how Resource Position will be used
13.5.8 Currently, the data table TableProcessingTimes contains only time for each animal type. Modify the table to include a different processing time for each vet (i.e., resource) and each animal type, as seen in Figure 13.38.193 Since four different resources are capable of processing dogs, there are four different processing times (i.e., 31 minutes for Billy, 32 minutes for Ellie, 33 minutes for Jim, and 34 minutes for Maisy) for animal type “0” (i.e., cats and dogs). For birds and iguanas, only two vets can see each of those types of patients. Therefore, only two different processing times are specified for types “2” and “3”. As Figure 13.38 illustrates, Jim will process Iguanas in 42 minutes while Ellie takes 43 minutes.
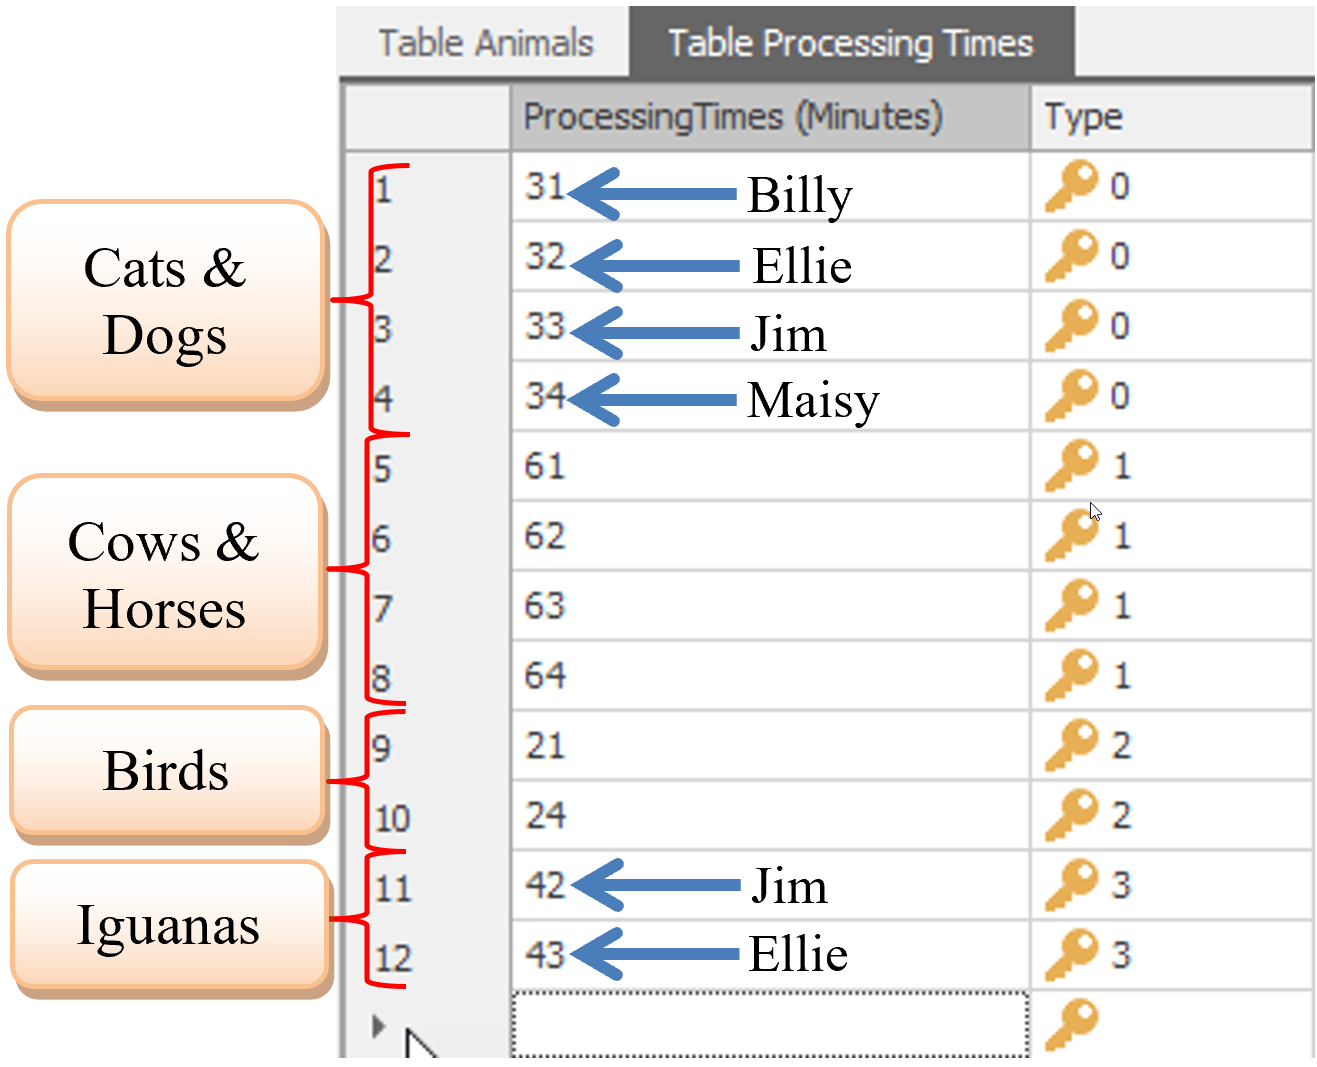
Figure 13.38: Add more Processing Times for Each Resource
Figure 13.39 shows the child-related table for animal type zero (i.e., cats and dogs) when expanding out the type “0” from the parent table TableAnimals. As you can see, only four processing times are related to type zero. Now, going back to the example in Figure 13.37, Ellie would correspond to the second position in the list, which translates to row two of the related table (i.e., 32 minutes).
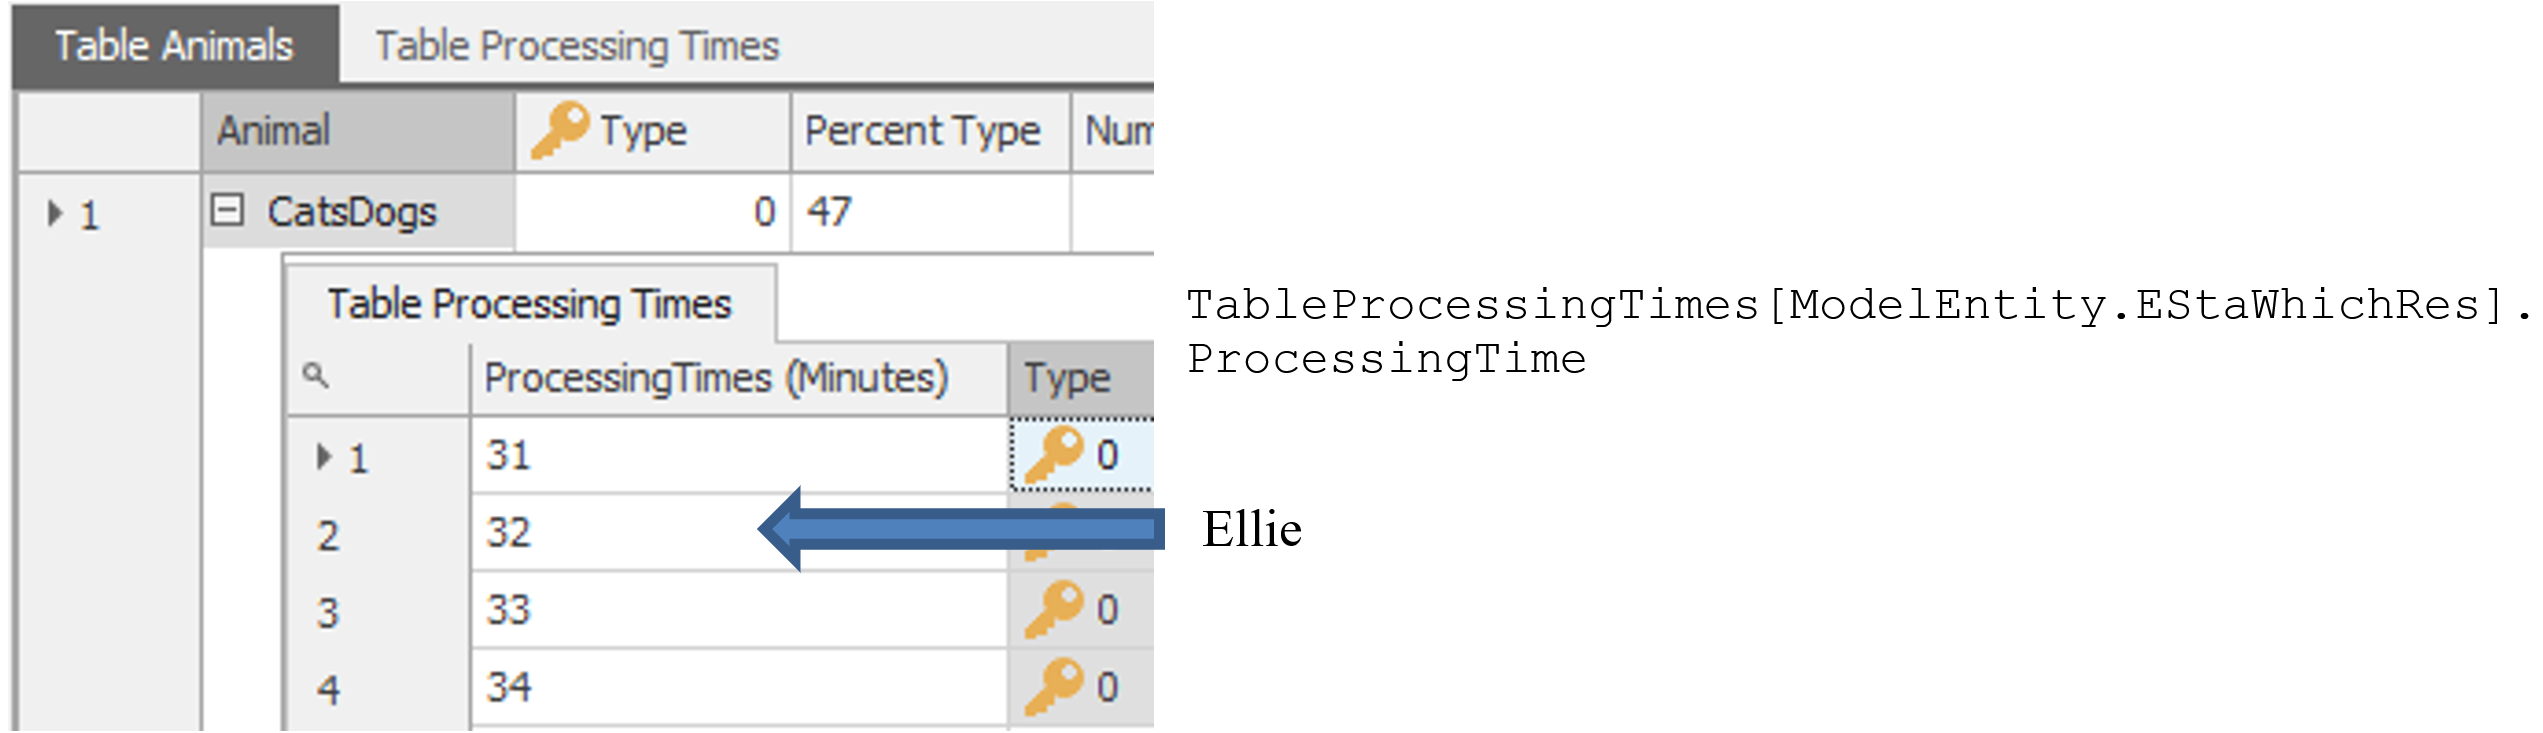
Figure 13.39: Showing the Child Sub Table for Cats and Dogs Animal Type
13.5.9 The only step left is appropriately assigning the EStaWhichRes variable based on which resource was seized. To accomplish this task, we will employ a Search process step where Table 13.2 explains all of the properties associated with the step.194 The Search process step can search a collection of items (see Table 13.3) and return Tokens associated with the items in the collection.
| Property | Description |
|---|---|
| Collection Type | The collection type to search (See Table 13.3 for more information). |
| Search Type | The type of search to perform (Forward, Backward, MinimizeReturnValue, and MaximizeReturnValue)195 |
| Match Condition | Optional match condition that can be used to filter the items in the collection before the search begins. Don’t forget to use the keyword Candidate in the condition. |
| Search Expression | An expression that is evaluated for each item found by the search. The total sum for this expression is returned in the ReturnValue of the original Token. One could save a particular Resource and seize the exact same one later. |
| Starting Index | One-based index to start searching. By default, it is one for Forward searches, while the number in the collection is for Backward searches. |
| Ending Index | One-based index-to-end searching to assist in narrowing the search within the collection. |
| Limit | An expression that specifies the maximum number of items that can be found and returned (e.g., Infinity or one) |
| Save Index Found | Specify an optional discrete state variable to save the last item found |
| Save Number Found | Specify an optional discrete state variable to save the number of items found. |
| Collection Type | Description |
|---|---|
| EntityPopulation | Search a particular entity population (i.e., ModelEntity, Worker, or Vehicles) |
| QueueState | Search the objects currently in one of the queues |
| TableRows | Search the rows in a Data table |
| ObjectList | Search the objects in a list (e.g., ResourceList, etc.) |
| NodeList | Search all nodes in a particular list. |
| TransporterList | Search all transporters in a particular list. |
| SeizedResources | Search the objects currently seized by the Parent Object, Associated Object, or Specific Object |
| ResourceOwners | Search the objects that currently own (i.e., seized) a Parent Object, an Associated Object or a Specific Object. Search all animals who have seized the SrvVetClinic capacity. |
| NetworkLinks | Search all links of a particular network. |
| NodeInboundLinks | Search all the inbound links of a particular node. |
| NodeOutboundLinks | Search all the outbound links of a particular node. |
| ObjectInstance | Search all objects of a particular class (e.g., all entities that are currently created). |
Insert a Search Step between the Seize and the Assign (see Figure 13.40). The “Original” branch is associated with the original Token (i.e., customer), while the “Found” branch will be invoked for a Token associated with each item found.196 The collection type will be an “object list” with the list name based on the animal type (TableAnimals.ListStaff). We only want to match the last resource seized by the patient with a resource from the resource list.197 If it finds a match, it will save the index (i.e., row position) in the ModelEntity’s StaWhichRes state variable.
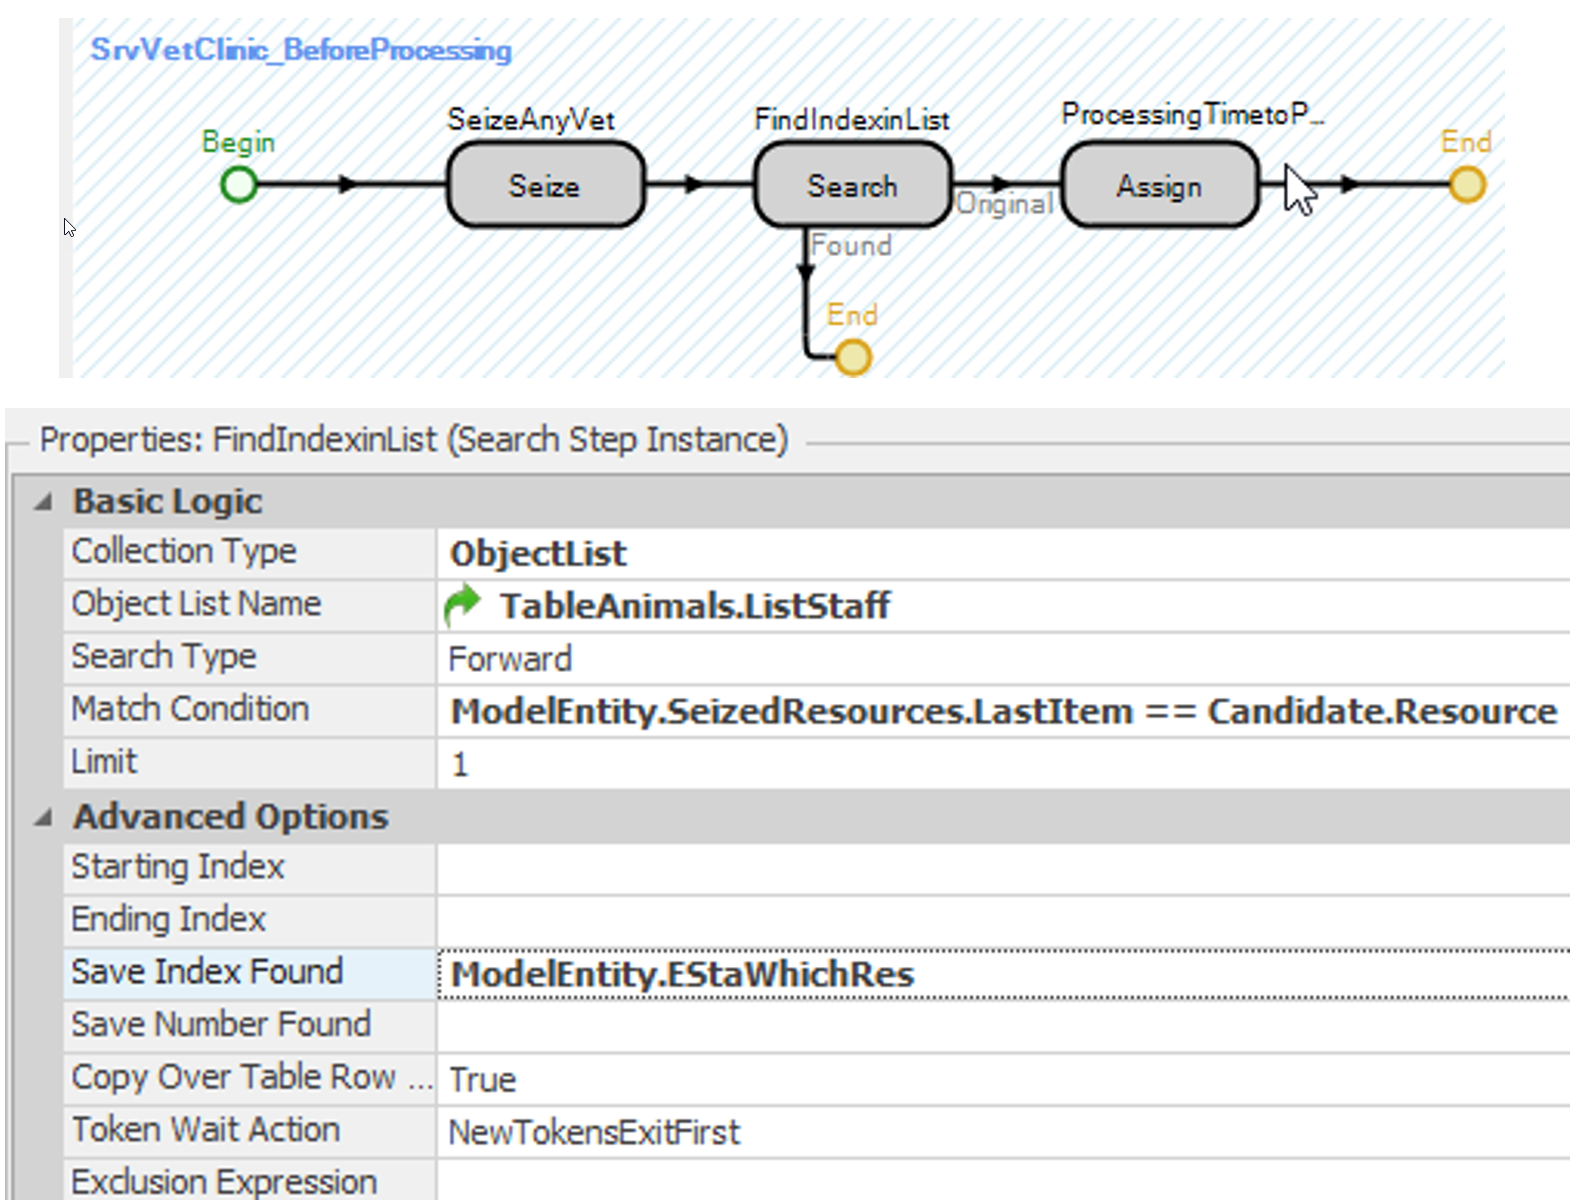
Figure 13.40: Adding a Search Step to Find the Index Position of the Seized Resource in the List
13.6 Changing the Resource Allocation Selection
In the original description, Jim was the preferred staff member to see Iguanas, while Ellie could see them if he was busy. The clinic is considering a new policy that when Jim becomes available, he will check to see if an Iguana is waiting, and if so, he will service these patients first before seeing the next patient. A “first-in and first-out” ranking scheme is currently being used by the SrvVetClinic to service the patients.
Resources like Servers have a static ranking rule198 that orders the requests waiting to be allocated capacity from this object. The Server and Resource will process them in the order in which the entities are sorted.199
13.6.1 Change the static ranking rule of the Resource ResJim to be the “largest value first.” The ranking expression should be the referenced property animal type since iguanas will always be serviced first if they have requested service.200 The static ranking rule works because the type of the animal does not change while the patient is waiting for a vet (see Figure 13.41).
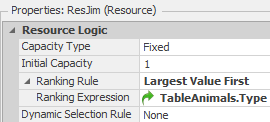
Figure 13.41: The Largest Value Static Ranking Rule
13.6.2 To visualize the ranking of ResJim, select ResJim and insert an animated queue (i.e., AllocationQueue) from the Contents section of the Attached Animation tab. The allocation queue is the queue that contains the requests for allocation of capacity of an object (e.g., Resource, Server, Worker, Vehicle, Combiner, etc.). Make the queue long enough to accommodate the size of the animals, as seen in Figure 13.42, which is drawn from right to left.
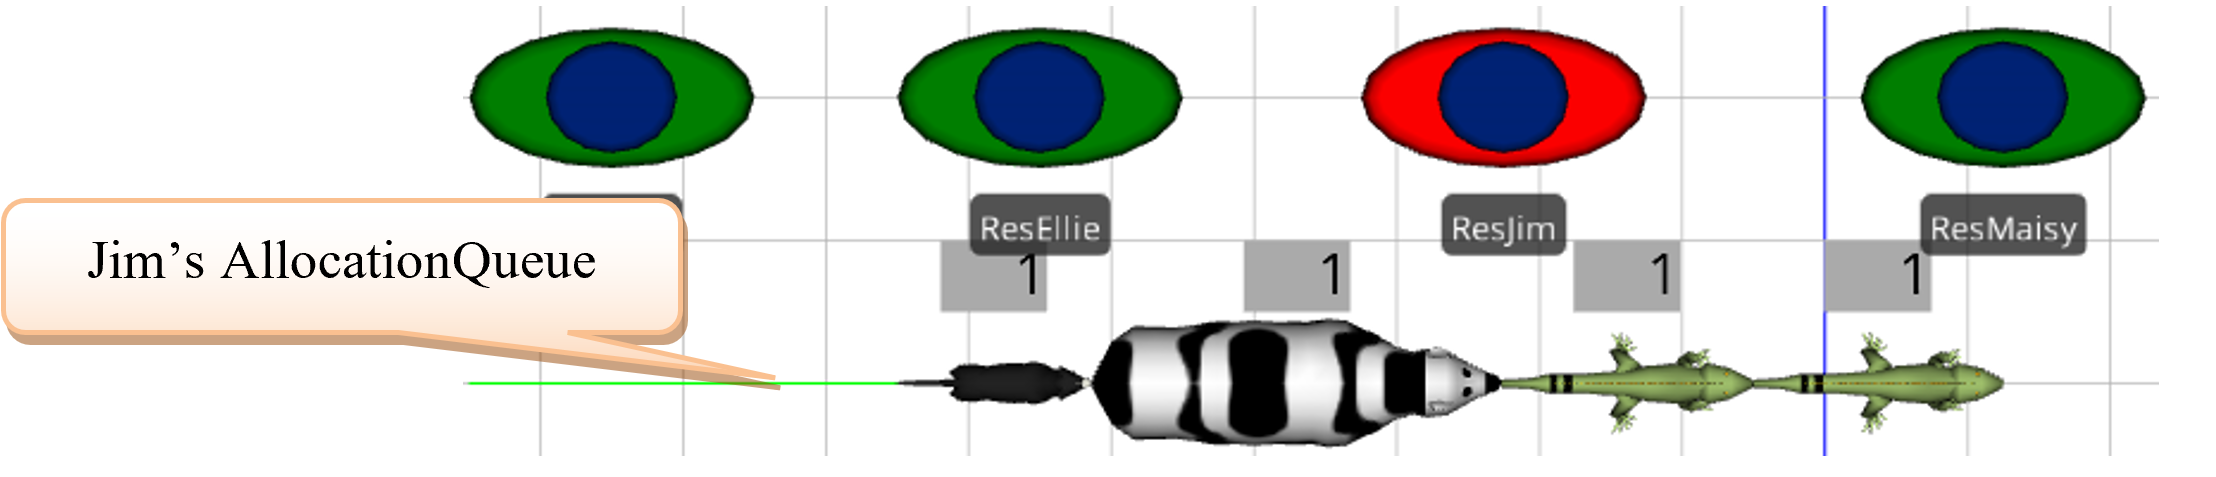
Figure 13.42: Adding a Search Step to Find the Index Position of the Seized Resource in the List
13.6.3 Save and run the model and observe what happens. The percentage of time Iguanas arrive may need to be altered to verify the model works the intended way.
13.6.4 Jim should service the Iguanas first and then service the remaining two animals in order of their arrival. One way to accomplish this ranking is to modify the Ranking Expression property to the value in Figure 13.43. The logical expression will give all iguana patients a value of one, while all other patient types would be zero, and therefore, preserve the arrival order to break the ties among remaining animals (arrival order is the tie-breaking for static ranking rule).

Figure 13.43: Modifying the Ranking Rule to not Service Cows before Dogs
13.7 Commentary
- A common modeling technique is adding additional state variables to the general entity to hold values or states. In the second part, an EStaXray discrete state variable could have been added to the entity. In the True branch of the “After Processing” add-on trigger, as seen in Figure 13.44, an Assign step could have been added to assign the value of one to the new EStaXray state variable to show that an X-ray is needed.
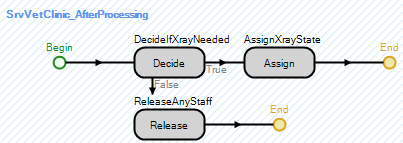
Figure 13.44: Using a State Variable to Assign Whether an X-ray is Needed or Not
- The link weights could have been specified as (1-ModelEntity.EStaXray) and (ModelEntity.EStaXray for the links to the exit Sink and the X-ray Server machine, respectively. Again, the link weights will take on zero or one and will never be the same. If the patient does need an X-ray, then (1-ModelEntity.EStaXray) would evaluate to one while (ModelEntity.EStaXray) would evaluate to zero.
- To some extent, one could have used the Secondary Resources to seize and release the vets. One could have easily used Before Processing under Other Resource Seizes and After Processing under Other Resource Releases with the same input as in Figure 13.23. However, the ability to release or not release if the animal needed a vet would require a little more modeling if you were trying to avoid processes altogether. It is easy not to release the Vets at the clinic and then only release them under the After Processing under Other Resource Releases of the SrvXrayMachine if the animal needs an X-ray. However, there is no mechanism to release the vets for those who do not. You would have to add an additional Server between the SrvVetClinic and the SnkExit that would release them. As has been seen in other chapters, one has more control and flexibility in using processes.
Recall, if you select the output node of the Source while holding down the Shift and Ctrl keys, SIMIO will allow you draw Links without first selecting a Link type from the Standard Library. This key sequence can be more efficient. Once the two Paths have been drawn, select them both and change their Drawn to Scale properties to “False” and the Logical Length properties to 30 meters.↩︎
The default symbol looks like a gray eye with a blue iris.↩︎
The Before Processing add-on process trigger is invoked after the entity has seized capacity of the server but before the entity is physically transferred to the processing station while the Processing add-on trigger is invoked after the entity has been transferred and directly before the delay for processing. The After Processing add-on process trigger is invoked directly after the processing has finished.↩︎
Note that we can utilize the secondary resources to seize and release additional resources (i.e., Resource for Processing) using the same list. However, utilizing processes gives you more flexibility and control.↩︎
The Object Type for the seize can be “Specific”, “From List”, or “Parent Object”. The “Specific” option allows you to select an individual Resource (e.g., ResJim), any object that has capacity (e.g., Servers, Paths), or any of the Stations inside objects that contain the capacity. The “Parent Object” will allow you to seize capacity of the object that is running the process which for the Server in this process is the Processing Station The list option will specify any list that contains objects that can be seized.↩︎
The Candidate object is a wild card that will be replaced with each Resource in the list that is currently not seized.↩︎
Recall that you need to download all four animal pictures as Sketchup™ files. Then, select each symbol in the Entity, and import the downloaded symbol. You may need to orient or resize the symbol based on the forward direction.↩︎
To invoke the “Created” add-on process, expand the “Add-On Process Triggers” of the Source in the properties window and double-click the label to invoke/create a process.↩︎
In this example, the Table Reference Assignments (i.e., On Created Entity) could be used to assign a table. Without knowledge of the object, you cannot be sure that the picture assignment via State Assignments happens before or after the table assignment, but with the processes approach you can control the order.↩︎
Any numeric column can be used to specify a random row of a table. The numbers do not need to add up to 1 or 100. SIMIO will take the sum of the column and then generate a random row based on the normalized percentages.↩︎
The “Associated Object” is the object the current token represents. In this case, it is the entity or patient. The other options are “Token” for the current token executing the process, the “ParentObject,” which would be the Source since it owns the Add-on Process Trigger, and “SpecificObjectOrElement” which allows you to set the table on a particular object or element.↩︎
Notice, the animal types were specified on purpose to be zero to three to represent the symbol numbering for the pictures. Also, the green arrow lets the user know this refers to a referenced property.↩︎
The Processing add-on process trigger occurs after the entities are transferred into the processing station so the animals will appear in the processing station even though they have not seized a vet. Therefore, use the Before Processing add-on process trigger to eliminate the animation issue.↩︎
The expression (TableAnimals.Type < 2 determines if the type is a zero or one could have been specified (TableAnimals.Type == 0 || TableAnimals.Type ==1 where || equals the Or logical operator.↩︎
The Number of Objects property specifies the unique number of objects to select out of a list while the Units Per Object specifies the number of each object to seize. For example, if your list had doctors and nurses and you set the Number of Objects to “1” and Units Per Object “2”, then it would seize either a doctor or nurse object but it would require two doctors or two nurses. Resources can be given capacity of more than one (e.g., you could have ten nurses but you do not want to have ten different nurses (i.e., Billy, Ellie, etc.).↩︎
Modeling the logic in this fashion has removed the two decision steps which will speed up the simulation model as well as simplify the logic when, for example, more animal types are added. Now that information is contained in the data table, eliminating the need to add additional process logic.↩︎
Note, we could have specified the link weights to be 1-TableAnimals.XrayLabPercentage for the link to the sink and TableAnimals.XrayLabPercentage for the link to the X-ray machine and the patients would have been routed correctly. However, this logic would only work if the patients did not need the same staff members to accompany them to the X-ray machine (i.e., they could be released before exiting the SrvVetClinic).↩︎
It has to be an Expression property to allow distributions to be specified.↩︎
Notice, an error would occur if we just specify TableProcessingTimes.ProcessingTime as was done in a previous chapter without first setting the row via a Set Row step or a By Sequence from the Transfernode.↩︎
We could turn on the trace and watch what the processing time delay was when the animal went into service.↩︎
Recall that “priority” is a SIMIO-defined state variable for entities.↩︎
We are multiplying by 60 because SIMIO has converted all times to hours internally.↩︎
SIMIO now provides a Dynamic Label Text property under the Animation section which can be used to a similar thing but the label appears below the ModelEntity.↩︎
One of the easiest ways to create the table is to copy it from an Excel worksheet where the table can be created easily. Tables can be copied to and from Excel. To copy from Excel, first copy the two dimensional table in Excel and then highlight all the current values in the SIMIO data table before pasting the new values which will overwrite any existing one and then create the any new rows as needed.↩︎
Recall the Token executing the process steps is typically associated with an entity. Therefore any steps (i.e., Transferring, Setting Nodes, etc.) are only applied to the ModelEntity associated with the Token. Often we may want to affect other objects (resources seized, etc.) besides the current entity, the search step can be used to create new Tokens associated with other objects. In some process steps, the action can be applied to the parent object of the Token’s associated object (e.g., the Server the logic resides).↩︎
MinimizeReturnValue and MaximizeReturnValue search values will search the collection and return up to the limit of items specified that minimizes or maximizes the Return Value expression property.↩︎
The original token will not move forward until all the searching is done.↩︎
Note the use of the Candidate keyword to represent each member of the collection being searched (i.e., like a wildcard *). Also, in the case of a cow or horse which requires two vets, the second vet seized will be lower in the list and our assumption would reflect less seniority and therefore slower.↩︎
The static ranking rules are First-in First-out (Default), Last-in Last-Out, Smallest Value, and Largest Value, where an expression provides the value for the last two rules (e.g., ModelEntity.Priority.↩︎
Also there is a dynamic selection rule, which will be considered in a later chapter.↩︎
If ResJim is busy processing a patient and an iguana is at the front of the server’s queue then ResEllie may still see them, which is acceptable. The goal is to maximize ResJim’s chances of seeing Iguana patients but not to eliminate her’s completely. If only ResJim could see iguanas then the ListIguana could be changed to only have Jim as a resource.↩︎